对360壳的分析流程
拿到🐖给的一个app,马上push来进行360免费壳的分析
Java层的前置分析
使用jadx打开可以看到StubApp 和 tianyu.util 以及 libjiagu,这些是360加固的一些特征点
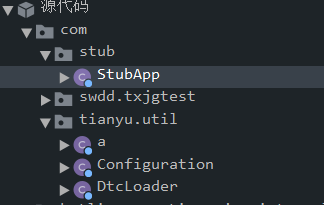

在attchBaseContext()中有加密的字符串
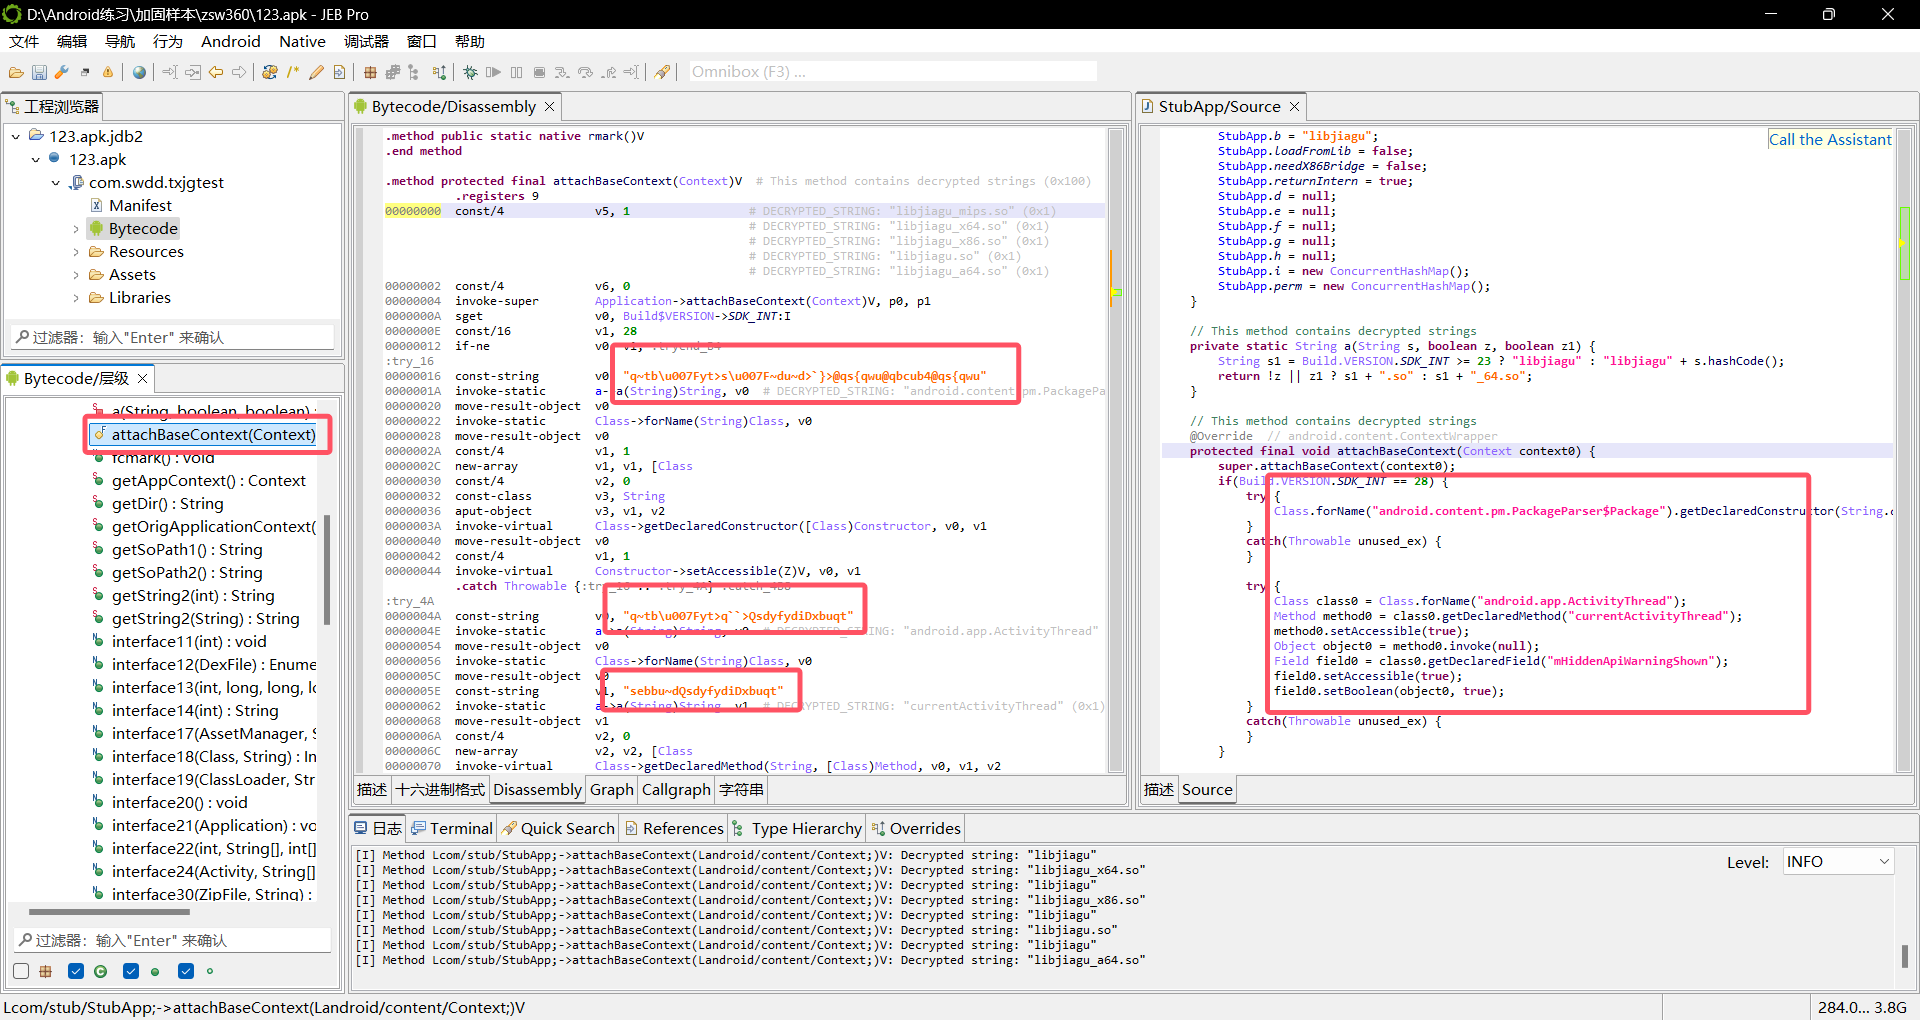
在左边的Smail代码中可以看到混淆的字符串,我们使用jeb会将加密字符串调用解密函数自动解密
当在jadx中可以看到这些加密字符串在运行时自动调用了解密函数
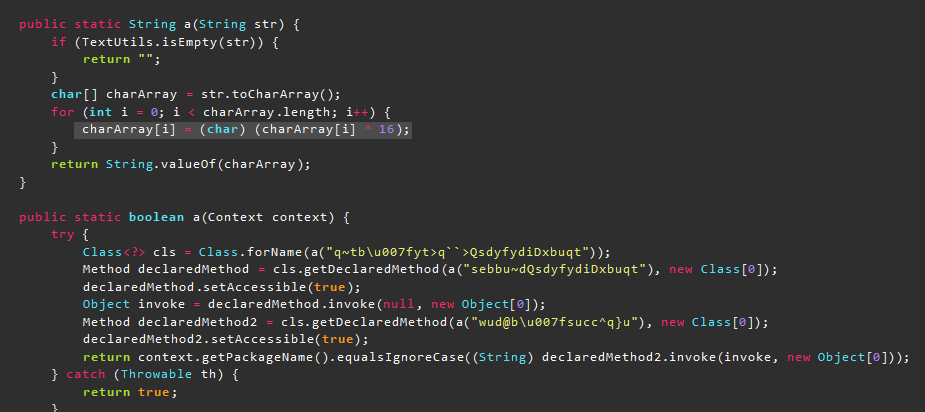
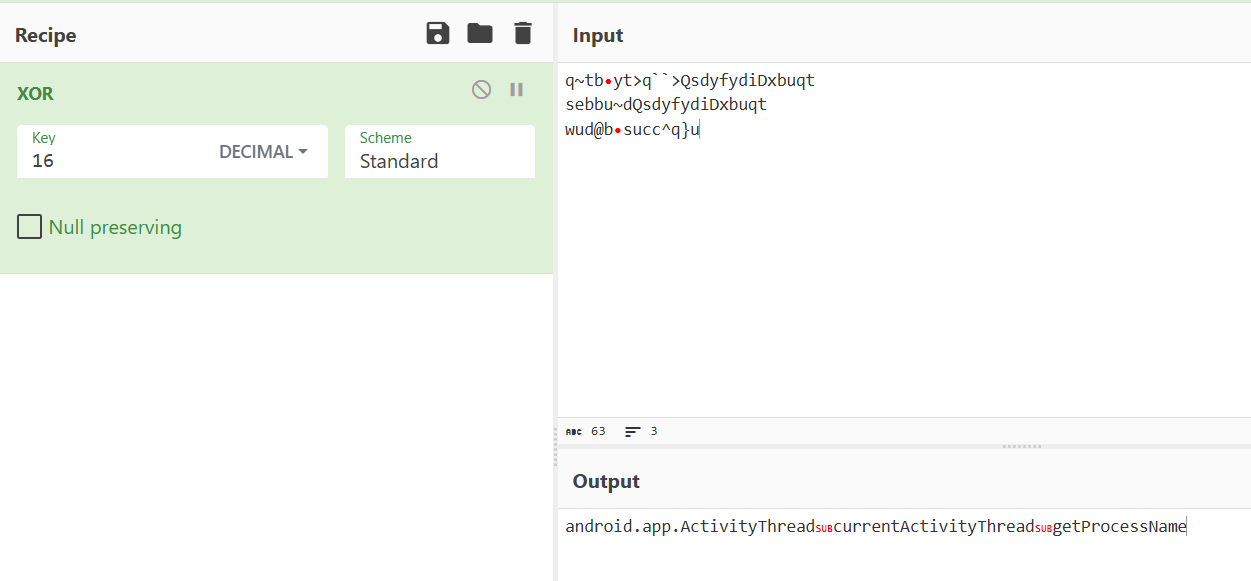
所谓的解密函数就是将加密字符串异或了16作为简单的混淆,其中的\u007F是Unicode代码,代表hex的0x7f
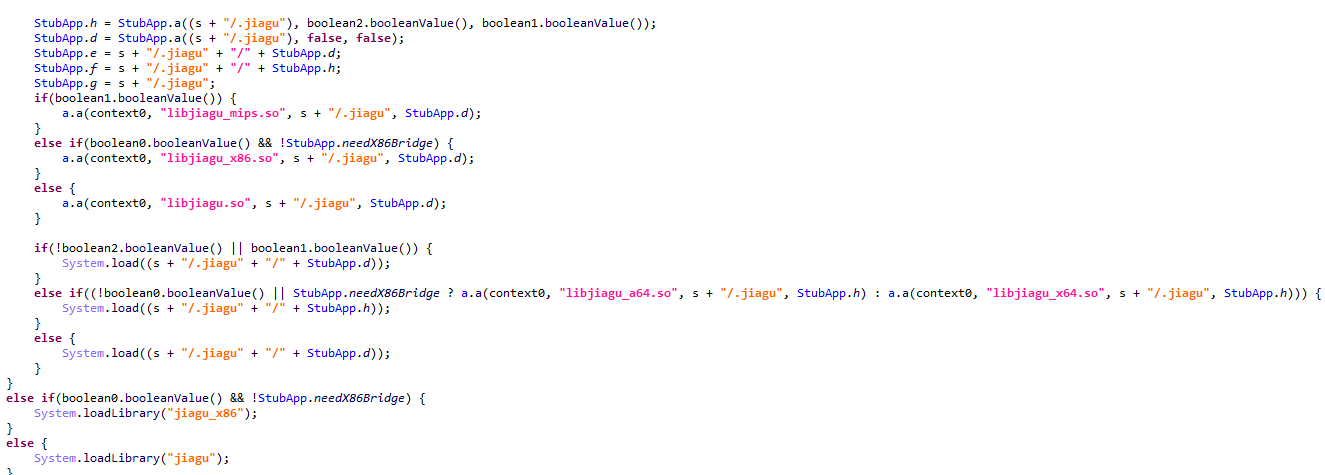
下方可以看到对不同架构分别加载不同的so文件
Native层分析
壳elf文件导入导出表的修复
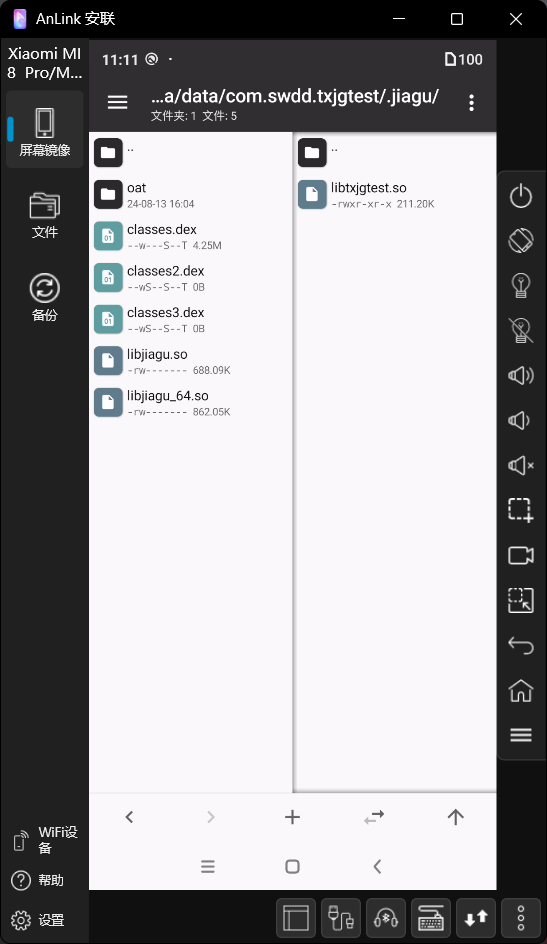
对so文件进行分析
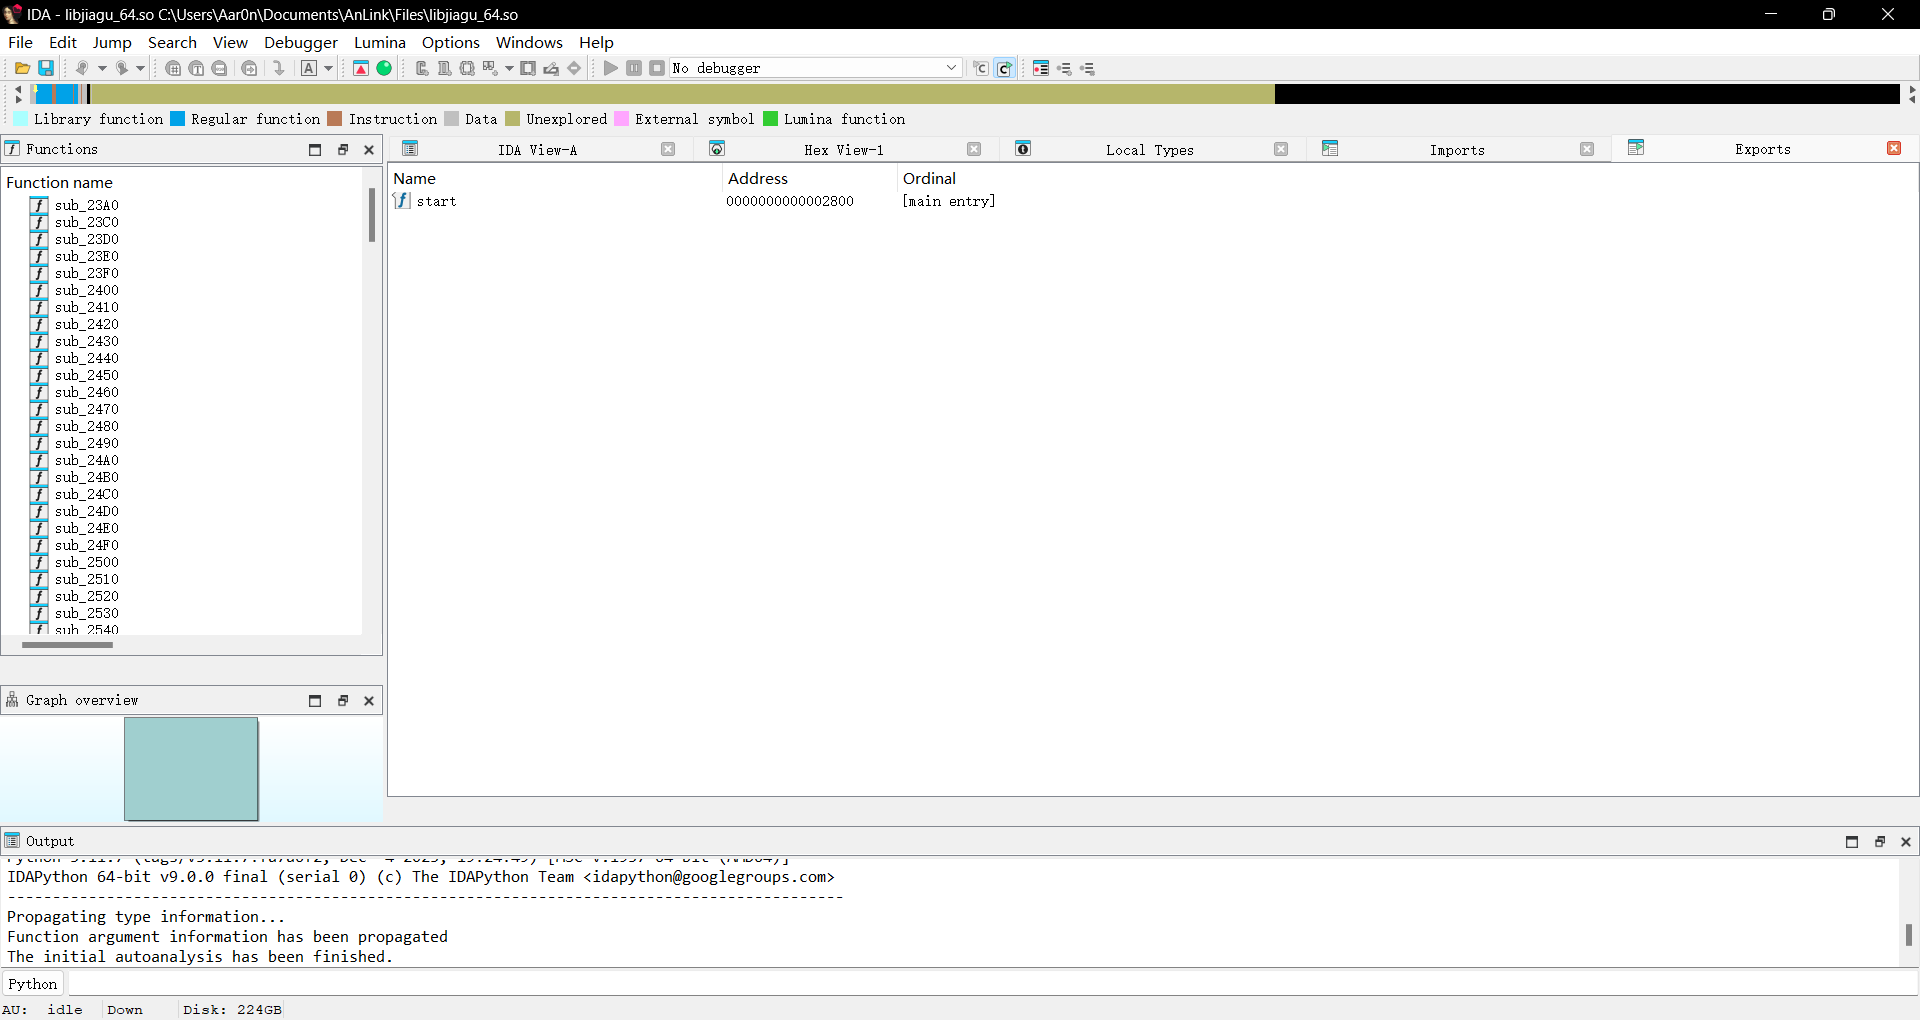
用ida进行分析发现导入表导出表都无法查看
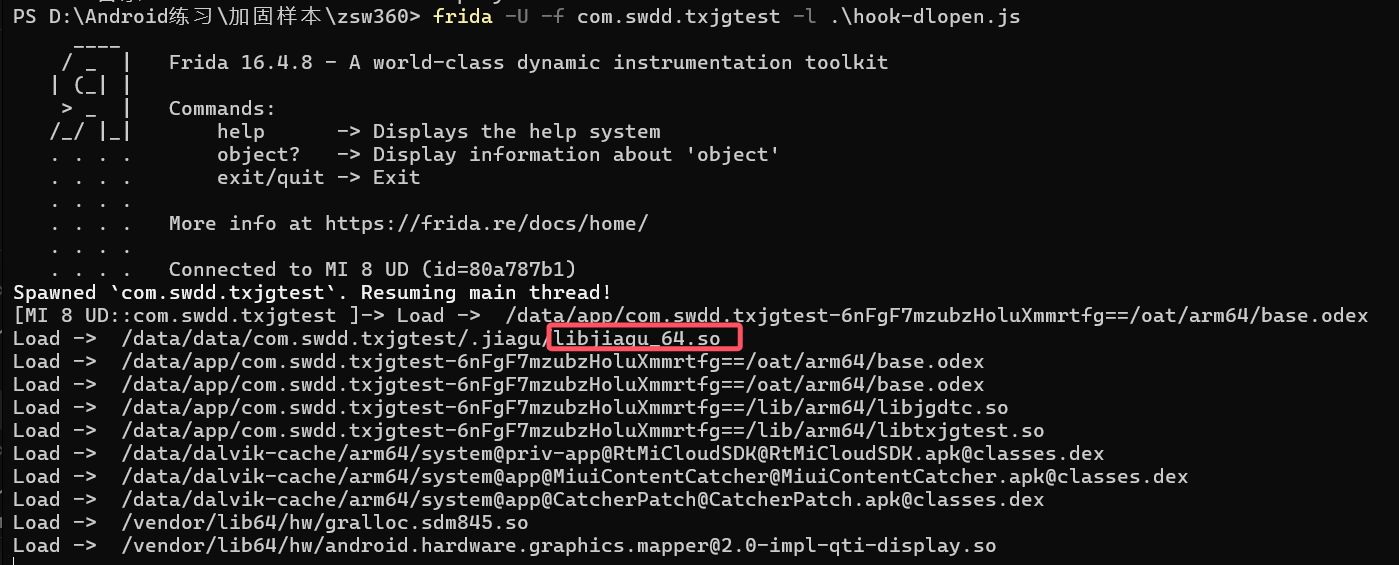
我们可以尝试hook一下dlopen查看加载了什么函数
tips:dlopen和普通的open函数有啥本质区别?open函数都很熟悉,本质是通过系统调用找到文件在磁盘的位置,然后生成fd,后续通过fd操控文件!相比之下,dlopen要复杂多了:不但要加载到内存,还要解析文件格式,然后修复链接
function hook_dlopen() {
    Interceptor.attach(Module.findExportByName("libdl.so", "android_dlopen_ext"), {
        onEnter: function (args) {
            console.log("Load -> ", args[0].readCString());
        }, onLeave: function () {

        }
    })
}

setImmediate(hook_dlopen);
运行后发现加载了以下文件
然后我们可以使用frida将这个so文件dump下来
使用frida -FU -l dump-so.js
function dump_so() {
    var soName = "libjiagu_64.so";
    var libSo = Process.getModuleByName(soName);
    var save_path = "/data/data/com.swdd.txjgtest/" + libSo.name + "_Dump";
    console.log("[Base]->", libSo.base);
    console.log("[Size]->", ptr(libSo.size));
    var handle = new File(save_path, "wb");
    Memory.protect(ptr(libSo.base), libSo.size, 'rwx');
    var Buffer = libSo.base.readByteArray(libSo.size);
    handle.write(Buffer);
    handle.flush();
    handle.close();
    console.log("[DumpPath->]", save_path);

}
setImmediate(dump_so);
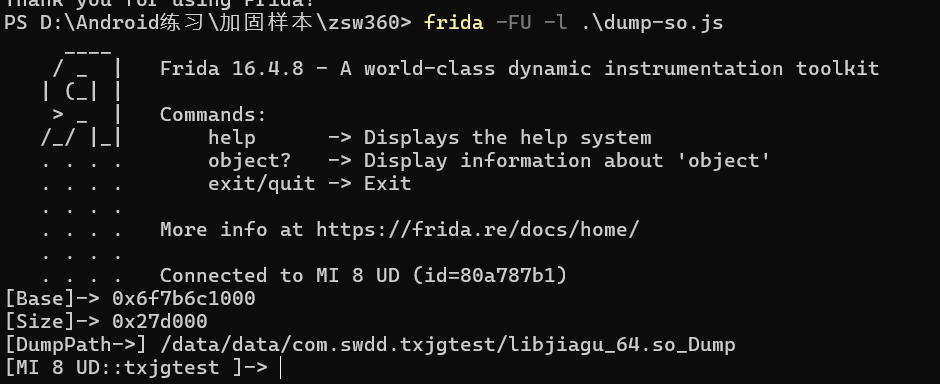
将以下参数保存下来留作备用
[Base]-> 0x6f7b6c1000
[Size]-> 0x27d000
[DumpPath->] /data/data/com.swdd.txjgtest/libjiagu_64.so_Dump
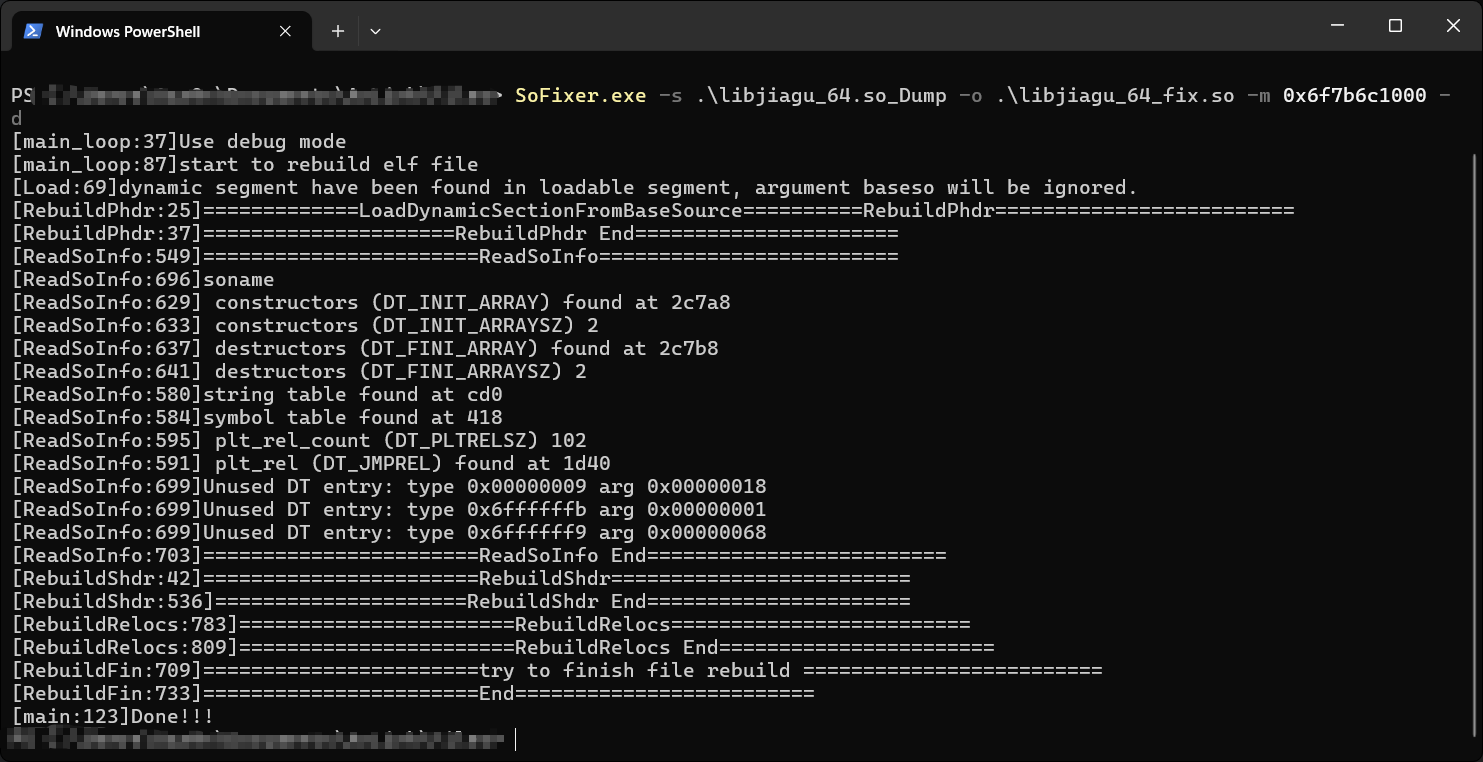
接下来再使用SoFixer来修复我们dump下来的so文件,-m需要输入文件的偏移地址
SoFixer.exe -s .\libjiagu_64.so_Dump -o .\libjiagu_64_fix.so -m 0x6f7b6c1000 -d
加固壳反调试分析
我们首先hook一下用于打开so的文件
function hook_dlopen() {
    Interceptor.attach(Module.findExportByName(null, "android_dlopen_ext"),
        {
            onEnter: function (args) {
                var pathptr = args[0];
                if (pathptr !== undefined && pathptr != null) {
                    var path = ptr(pathptr).readCString();
                    console.log("load " + path);
                }
            }
        }
    );
}

setImmediate(hook_dlopen)

发现输出如上,所以反调试是在 libjiagu_64.so 中
然后我们再尝试hook一下打开文件的函数 open
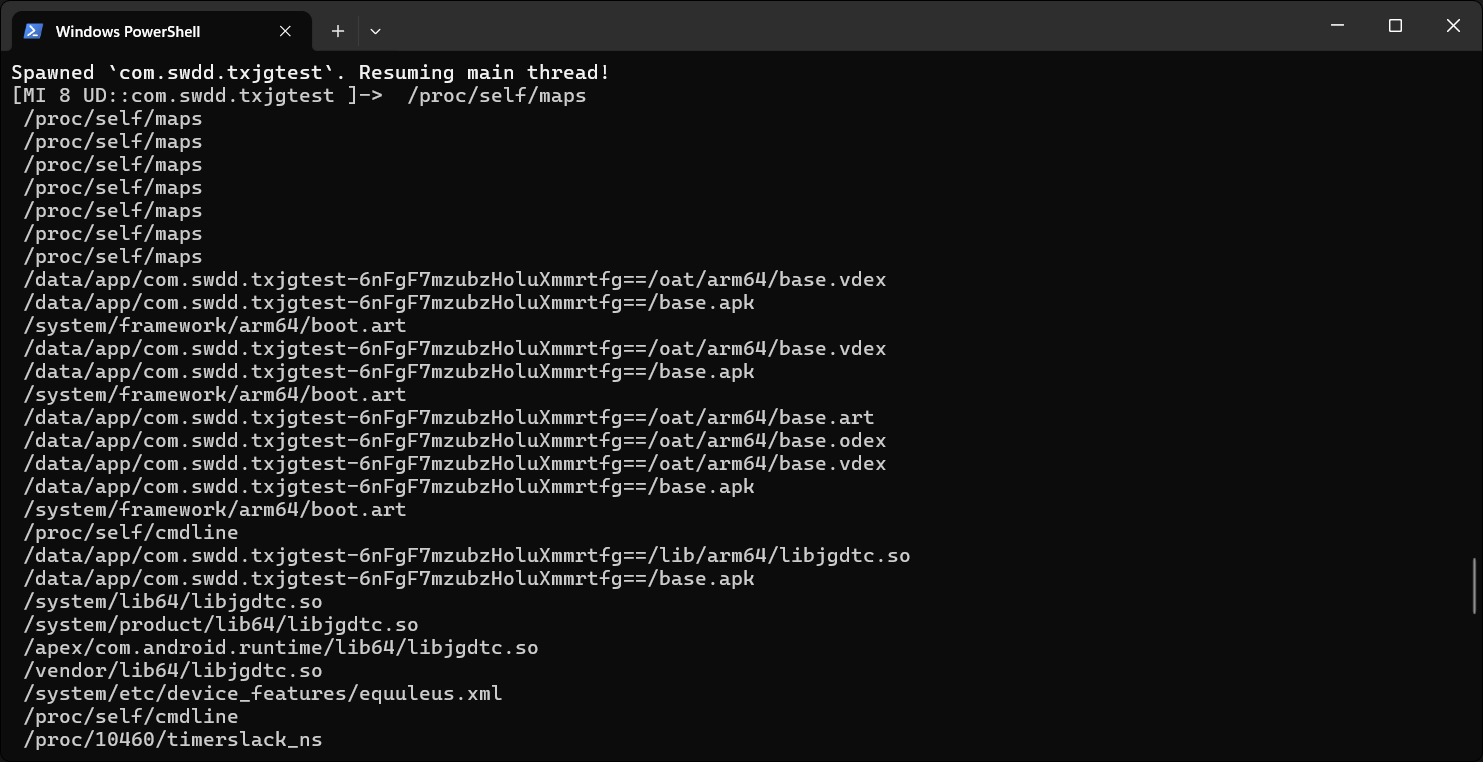
可以看到在前面几个打开函数的操作中都定向到了/proc/self/maps中
/proc/self/maps 是一个特殊的文件,它包含了当前进程的内存映射信息。当你打开这个文件时,它会显示一个列表,其中包含了进程中每个内存区域的详细信息。这些信息通常包括:
- 起始地址(Start Address)
- 结束地址(End Address)
- 权限(如可读、可写、可执行)
- 共享/私有标志(Shared or Private)
- 关联的文件或设备(如果内存区域是文件映射的)
- 内存区域的偏移量
- 内存区域的类型(如匿名映射、文件映射、设备映射等)
当注入
frida后,在maps文件中就会存在frida-agent-64.so、frida-agent-32.so等文件。
我们尝试注入以下脚本 ->
function my_hook_dlopen(soName = '') {
    Interceptor.attach(Module.findExportByName(null, "android_dlopen_ext"),
        {
            onEnter: function (args) {
                var pathptr = args[0];
                if (pathptr !== undefined && pathptr != null) {
                    var path = ptr(pathptr).readCString();
                    if (path.indexOf(soName) >= 0) {
                        this.is_can_hook = true;
                    }
                }
            },
            onLeave: function (retval) {
                if (this.is_can_hook) {
                    hook_proc_self_maps();
                }
            }
        }
    );
}

function hook_proc_self_maps() {
    const openPtr = Module.getExportByName(null, 'open');
    const open = new NativeFunction(openPtr, 'int', ['pointer', 'int']);
    var fakePath = "/data/data/com.swdd.txjgtest/maps";
    Interceptor.replace(openPtr, new NativeCallback(function (pathnameptr, flag) {
        var pathname = Memory.readUtf8String(pathnameptr);
        console.log("open",pathname);
        if (pathname.indexOf("maps") >= 0) {
            console.log("find",pathname,",redirect to",fakePath);
            var filename = Memory.allocUtf8String(fakePath);
            return open(filename, flag);
        }
        var fd = open(pathnameptr, flag);
        return fd;
    }, 'int', ['pointer', 'int']));
}


setImmediate(my_hook_dlopen,"libjiagu");
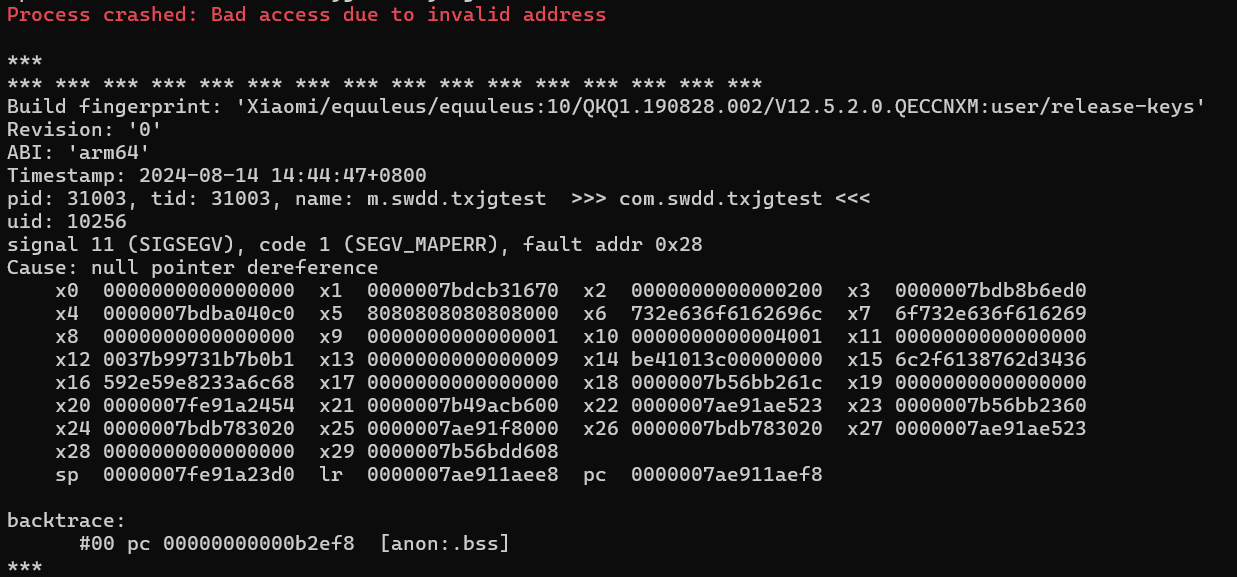
但是当注入这段脚本后,进程由于非法内存访问而退出了,这说明 360 加固不仅读取 maps 文件,并且会尝试访问 maps 文件中所记录的文件或内存映射。这里由于 frida 注入后重启 apk, 但是备份的 maps 文件中记录的是先前的映射起始地址 (这块内存在关闭 apk 后就被抹去了), 所以当壳尝试访问其中的映射时产生了非法内存访问从而让进程崩溃
那我们可以自己创建一个maps,使其在读取maps文件的时候定向到我们自定义的maps中之后,再注入frida
function addr_in_so(addr){
    var process_Obj_Module_Arr = Process.enumerateModules();
    for(var i = 0; i < process_Obj_Module_Arr.length; i++) {
        if(addr>process_Obj_Module_Arr[i].base && addr<process_Obj_Module_Arr[i].base.add(process_Obj_Module_Arr[i].size)){
            console.log(addr.toString(16),"is in",process_Obj_Module_Arr[i].name,"offset: 0x"+(addr-process_Obj_Module_Arr[i].base).toString(16));
        }
    }
}

function setRWX(){
    var Modules = Process.enumerateModules();
    for(var index = 0 ; index < Modules.length ; index ++ ){
        var Mem = Modules[index];
        // console.log("[libName]->",Mem.name);
        // console.log("[libBase]->",Mem.base);
        // console.log("[libSize]->",Mem.size);
        //console.warn("[Warning]-> "+ Mem.name + " Was setting rwx");
        Memory.protect(Mem.base,Mem.size,"rwx");
    }
}


function hook_proc_self_maps() {
    setRWX();

    var setOnce = true;
    const openPtr = Module.getExportByName(null, 'open');
    const open = new NativeFunction(openPtr, 'int', ['pointer', 'int']);
    var fakePath = "/data/data/com.swdd.txjgtest/maps";
    Interceptor.replace(openPtr, new NativeCallback(function (pathnameptr, flag) {
        var fd = open(pathnameptr, flag);
        var pathname = Memory.readUtf8String(pathnameptr);

        var filename = Memory.allocUtf8String(fakePath);
       // console.log("open",pathname);//,Process.getCurrentThreadId()
        if (pathname.indexOf("maps") >= 0) {
            //console.log("find",pathname+", redirect to",fakePath);
            return open(filename, flag);
        }
        if (pathname.indexOf("dex") >= 0 && setOnce) {
            console.log("[OpenDex]-> ", pathname);
            console.warn('RegisterNatives called from:\n' + Thread.backtrace(this.context, Backtracer.FUZZY).map(DebugSymbol.fromAddress).join('\n') + '\n'); //addr_in_so
        }

        return fd;
    }, 'int', ['pointer', 'int']));
}

function my_hook_dlopen(soName='') {
    Interceptor.attach(Module.findExportByName(null, "android_dlopen_ext"),
        {
            onEnter: function (args) {
                var pathptr = args[0];
                if (pathptr !== undefined && pathptr != null) {
                    var path = ptr(pathptr).readCString();
                    //console.log(path);
                    if (path.indexOf(soName) >= 0) {
                        this.is_can_hook = true;
                    }
                }
            },
            onLeave: function (retval) {
                if (this.is_can_hook) {
                    hook_proc_self_maps();
                }
            }
        }
    );
}
setImmediate(my_hook_dlopen,'libjiagu');
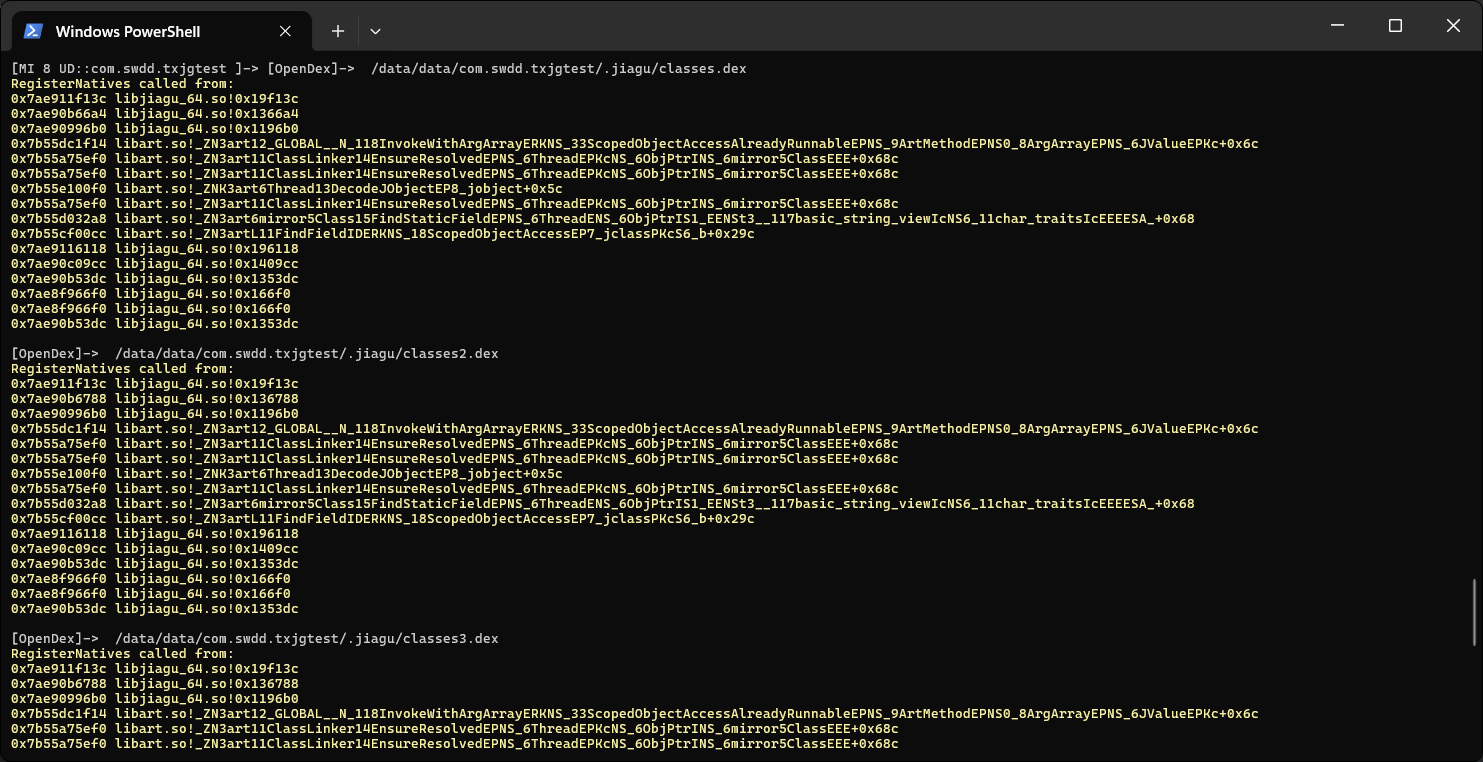
可以发现每次加载dex的偏移量都是相似的,我们便可以从地址入手进行分析
-------------------------------------------------------分割线---------------------------------------------------------------
Tips:在对系统函数进行 hook 检测时,发现了一些异常 crash,并且只发生在 Android 10 系统上,经过对错误日志分析,确认这是 Android 10 新增加的功能:系统库的代码段会映射到可执行内存,没有读权限。hook 检测的逻辑是需要读取指令解析来确认,所以导致了异常。
从官方介绍 可知,增加该功能是为了安全考虑,并且该功能只支持 AArch64 架构,需要硬件和 Kernel 共同支持,硬件提供 PAN(Privileged Access Never) 和 kernel 提供 XOM(eXecute-Only Memory),详细资料可查看:Execute-only Memory (XOM) for AArch64 Binaries
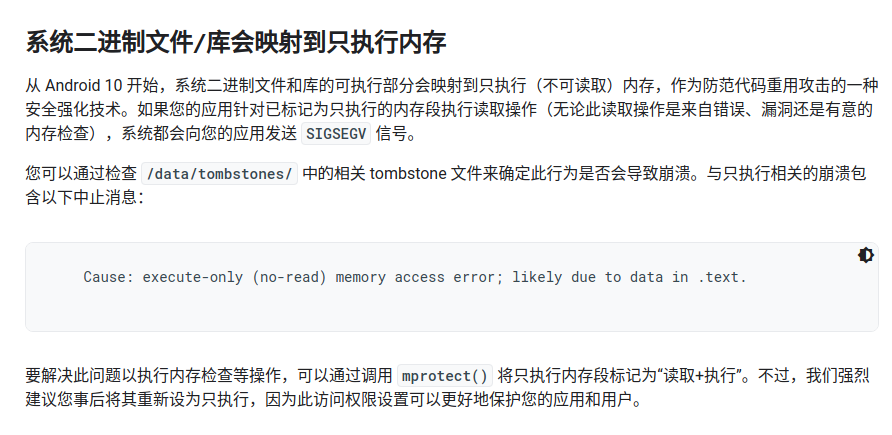
但是在 Android 11 以及之后的版本上,该功能又被放弃了。不支持的原因主要是 kernel 不在支持 XOM,原因也可以在上面的详细资料中找到。
Android 使用原理
从上面和相关资料可知,主要实现在 kernel 和硬件上,Android 只是功能的使用者,下面只讨论 Android 相关的配置。
Android 是一个庞大的系统,不可能有人能了解到该系统的每个细节,我们应该掌握方法,在遇到不懂的问题时,能运用我们的方法快速定位到问题,了解其实现原理。
针对该问题,我们可以从错误日志开始入手,然后一步一步找到系统的改动处。
错误日志对应代码
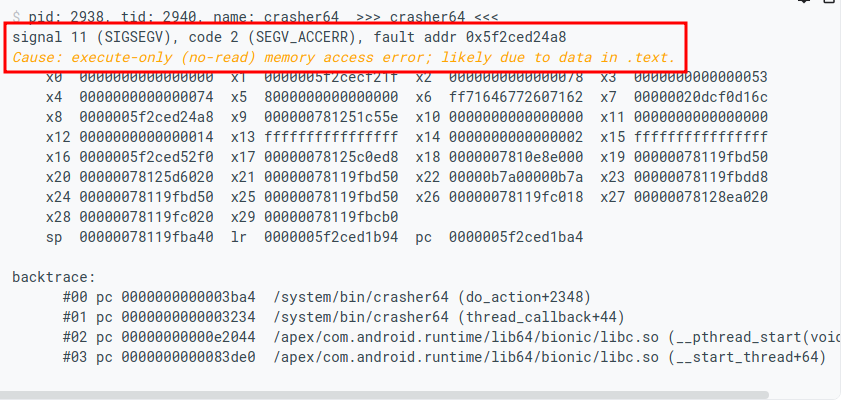
根据错误日志可找到相关代码处:
// http://aospxref.com/android-10.0.0_r47/xref/system/core/debuggerd/libdebuggerd/tombstone.cpp?r=&mo=3649&fi=108#108
static void dump_probable_cause(log_t* log, const siginfo_t* si, unwindstack::Maps* maps) {
  std::string cause;
  if (si->si_signo == SIGSEGV && si->si_code == SEGV_MAPERR) {
    if (si->si_addr < reinterpret_cast<void*>(4096)) {
      cause = StringPrintf("null pointer dereference");
    } else if (si->si_addr == reinterpret_cast<void*>(0xffff0ffc)) {
      cause = "call to kuser_helper_version";
    } else if (si->si_addr == reinterpret_cast<void*>(0xffff0fe0)) {
      cause = "call to kuser_get_tls";
    } else if (si->si_addr == reinterpret_cast<void*>(0xffff0fc0)) {
      cause = "call to kuser_cmpxchg";
     } else if (si->si_addr == reinterpret_cast<void*>(0xffff0fa0)) {
       cause = "call to kuser_memory_barrier";
     } else if (si->si_addr == reinterpret_cast<void*>(0xffff0f60)) {
       cause = "call to kuser_cmpxchg64";
     }
   } else if (si->si_signo == SIGSEGV && si->si_code == SEGV_ACCERR) {
     unwindstack::MapInfo* map_info = maps->Find(reinterpret_cast<uint64_t>(si->si_addr));
     if (map_info != nullptr && map_info->flags == PROT_EXEC) { // 进程 /proc/[pid]/maps 查询,若找到并且有可执行权限
       cause = "execute-only (no-read) memory access error; likely due to data in .text.";
     }
   } else if (si->si_signo == SIGSYS && si->si_code == SYS_SECCOMP) {
     cause = StringPrintf("seccomp prevented call to disallowed %s system call %d", ABI_STRING,
                          si->si_syscall);
   }

   if (!cause.empty()) _LOG(log, logtype::HEADER, "Cause: %s\n", cause.c_str());
maps 是进程当前内存信息,出现内存访问异常时,查询异常的地址所在模块,若模块存在并且有可执行权限,则就是触发了代码段读异常。
内存代码段配置
查看 Android 10 的进程内存中的系统库,对于代码段来说,只有执行权限,没有读权限,如下图:
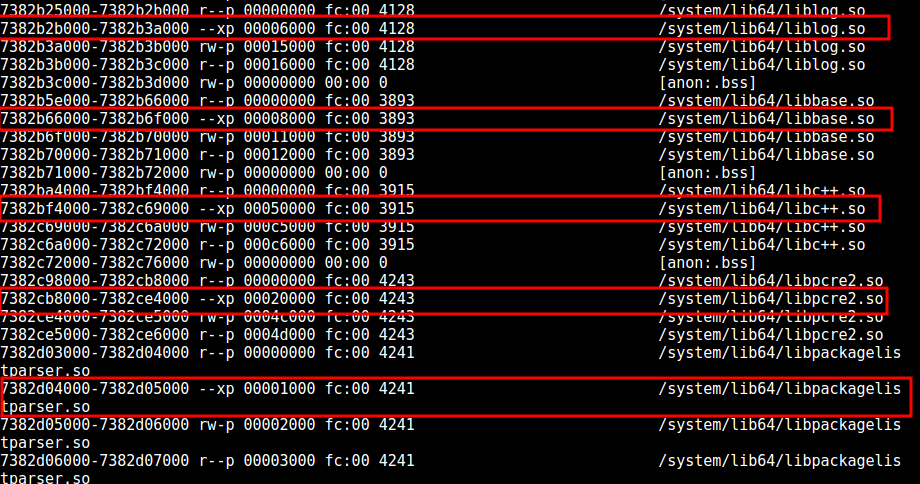
针对内存代码段去掉读权限,首先猜测可能是在 linker 在加固 so 时,做了特殊处理了,去掉了读权限,但是阅读了加载 so 的代码后,未发现有特殊处理。 所以,应该是在打包是进行了特殊配置。
- 所以对上方读取maps的部分预先执行
setRWX()使其有可读可写可执行权限,使其能够正常运行
壳elf文件逻辑分析
在我们跳到调用地址的地方往下寻找查看到了一处引用
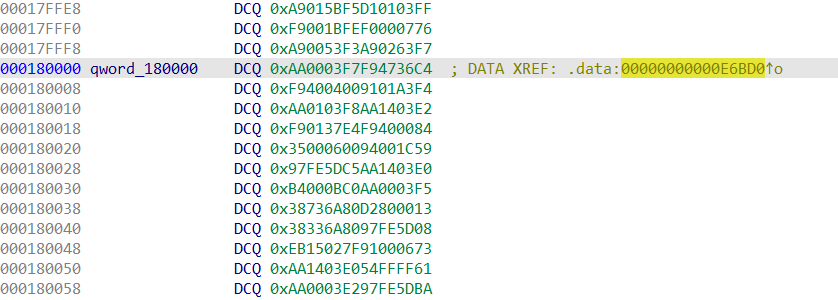
继续往上跟踪函数

可以看到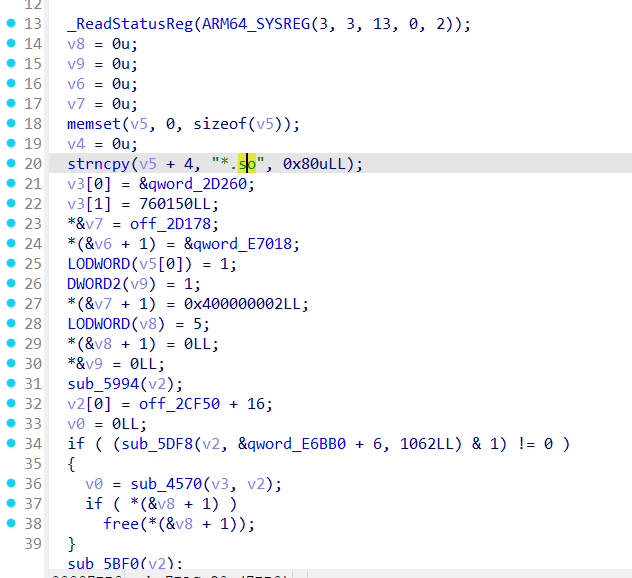
基本上可以判断这是在壳ELF中实现link加载主ELF文件了
主elf文件解密分析
在壳文件link主文件的时候必须得用dlopen来加载文件,我们可以hook这两个函数进行分析
function hook_dlopen() {
    Interceptor.attach(Module.findExportByName("libdl.so", "android_dlopen_ext"), {
        onEnter: function (args) {
            console.warn("[android_dlopen_ext] -> ", args[0].readCString());
        }, onLeave: function () {

        }
    })
}

function hook_dlopen2() {
    Interceptor.attach(Module.findExportByName("libdl.so", "dlopen"), {
        onEnter: function (args) {
            console.log("[dlopen] -> ", args[0].readCString());
        }, onLeave: function () {

        }
    })
}
setImmediate(hook_dlopen2);
setImmediate(hook_dlopen);
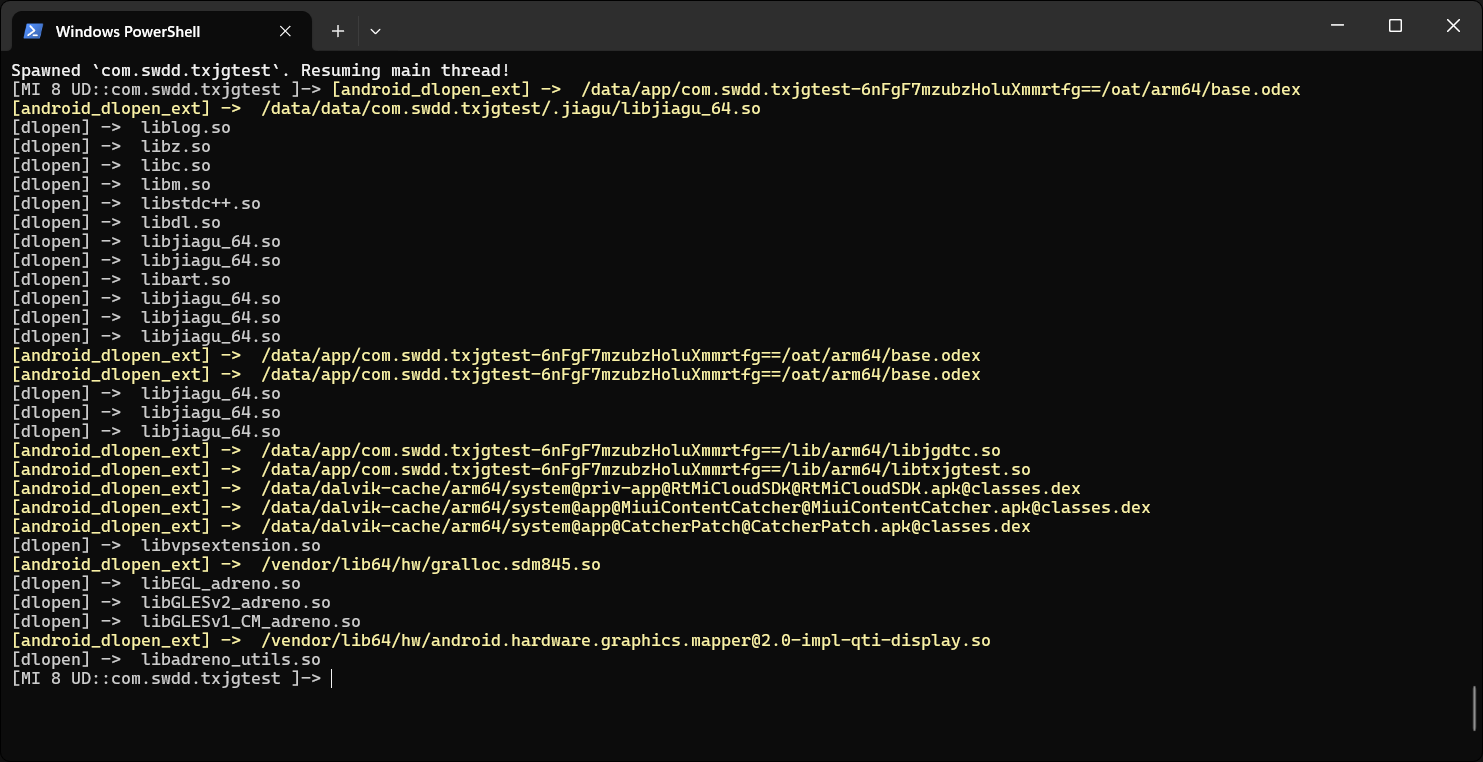
根据流程可以知道是link加固so文件,接下来我们可以从fix的文件中找加载的so文件
打开010搜索elf文件头
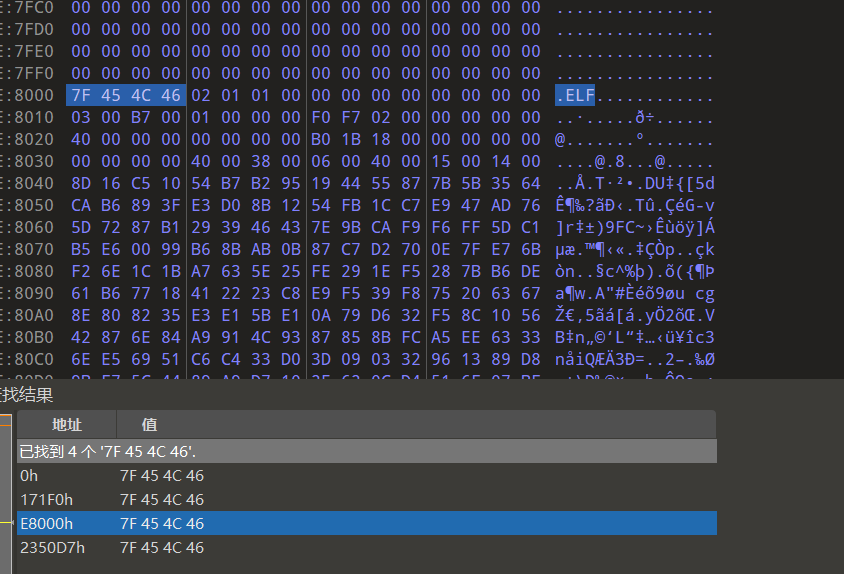
我们将ELF文件dump出来使用 stalker_trace_so 进行流程分析
call1:JNI_OnLoad
call2:j_interpreter_wrap_int64_t
call3:interpreter_wrap_int64_t
call4:_Znwm
call5:sub_13364
call6:_Znam
call7:sub_10C8C
call8:memset
call9:sub_9988
call10:sub_DE4C
call11:calloc
call12:malloc
call13:free
call14:sub_E0B4
call15:_ZdaPv
call16:sub_C3B8
call17:sub_C870
call18:sub_9538
call19:sub_9514
call20:sub_C9E0
call21:sub_C5A4
call22:sub_9674
call23:sub_15654
call24:sub_15DCC
call25:sub_15E98
call26:sub_159CC
call27:sub_1668C
call28:sub_15A4C
call29:sub_15728
call30:sub_15694
call31:sub_94B0
call32:sub_C8C8
call33:sub_CAC4
call34:sub_C810
call35:sub_906C
call36:dladdr
call37:strstr
call38:setenv
call39:_Z9__arm_a_1P7_JavaVMP7_JNIEnvPvRi
call40:sub_9A08
call41:sub_954C
call42:sub_103D0
call43:j__ZdlPv_1
call44:_ZdlPv
call45:sub_9290
call46:sub_7BAC
call47:strncpy
call48:sub_5994
call49:sub_5DF8
call50:sub_4570
call51:sub_59DC
call52:_ZN9__arm_c_19__arm_c_0Ev
call53:sub_9F60
call54:sub_957C
call55:sub_94F4
call56:sub_CC5C
call57:sub_5D38
call58:sub_5E44
call59:memcpy
call60:sub_5F4C
call61:sub_583C
call62:j__ZdlPv_3
call63:j__ZdlPv_2
call64:j__ZdlPv_0
call65:sub_9F14
call66:sub_9640
call67:sub_5894
call68:sub_58EC
call69:sub_9B90
call70:sub_2F54
call71:uncompress
call72:sub_C92C
call73:sub_440C
call74:sub_4BFC
call75:sub_4C74
call76:sub_5304
call77:sub_4E4C
call78:sub_5008
call79:mprotect
call80:strlen
call81:sub_3674
call82:dlopen
call83:sub_4340
call84:sub_3A28
call85:sub_3BDC
call86:sub_2F8C
call87:dlsym
call88:strcmp
call89:sub_5668
call90:sub_4C40
call91:sub_5BF0
call92:sub_7CDC
call93:sub_468C
call94:sub_7E08
call95:sub_86FC
call96:sub_8A84
call97:sub_7FDC
call98:interpreter_wrap_int64_t_bridge
call99:sub_9910
call100:sub_15944
call101:puts
壳 elf 加载主 elf, 并且 program header 还被加密了,感觉这种形式很像是 自实现 linker 加固 so
对于这种加固方式,壳 elf 在代码中自己实现了解析 ELF 文件的函数,并将解析结果赋值到 soinfo 结构体中,随后调用 dlopen 进行手动加载
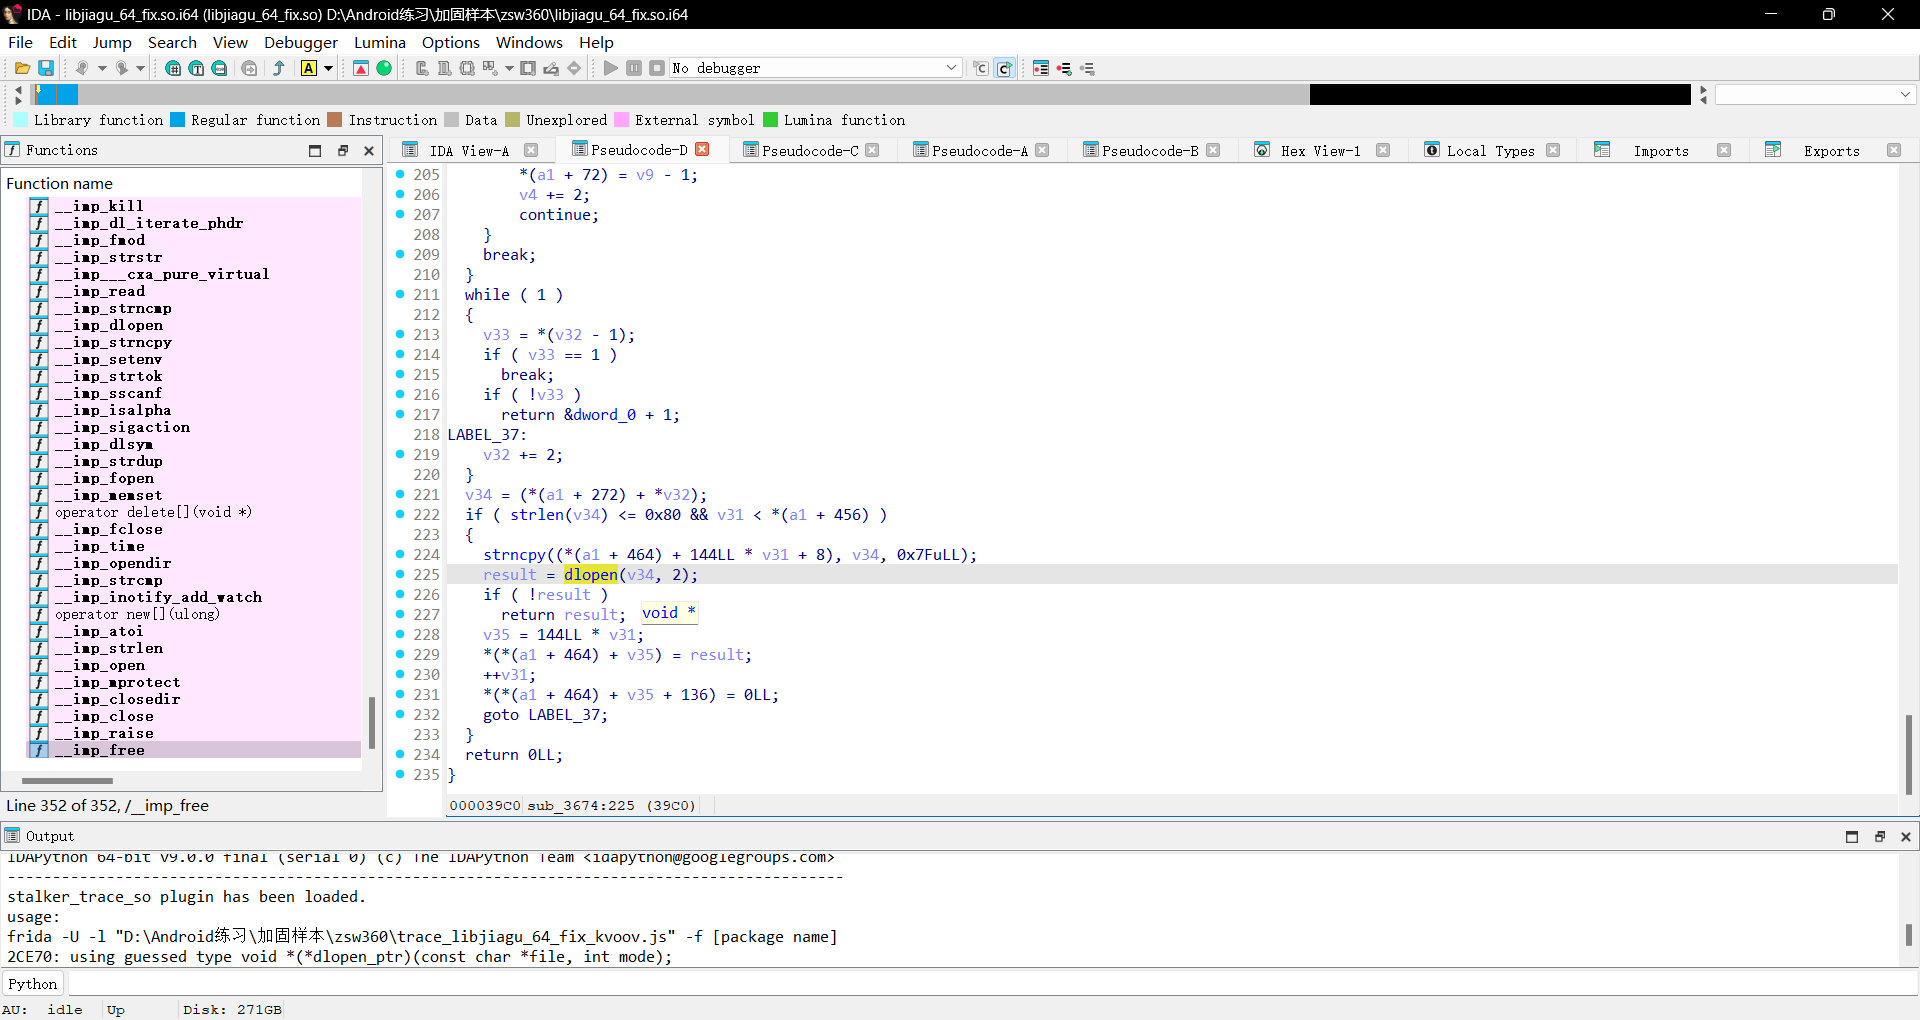
来到 ida 里面在导入表对 dlopen 进行交叉引用,我们看到 dlopen 只有 1 个交叉引用

进来可以看到一堆switch判断
查看AOSP源码可以看到与其中的预链接 ( soinfo::prelink_image ) 这部分的操作极为的相似
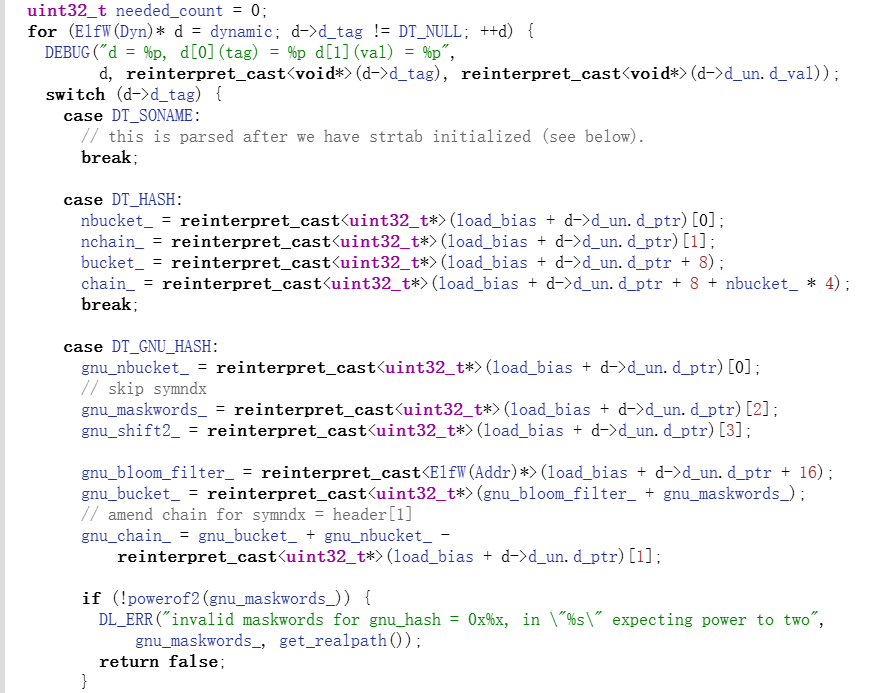
那么我们就可以在ida中使用Shift+F1导入soinfo的结构体
//IMPORTANT
//ELF64 启用该宏
#define __LP64__  1
//ELF32 启用该宏
//#define __work_around_b_24465209__  1

/*
//https://android.googlesource.com/platform/bionic/+/master/linker/Android.bp
架构为 32 位 定义__work_around_b_24465209__宏
arch: {
        arm: {cflags: ["-D__work_around_b_24465209__"],},
        x86: {cflags: ["-D__work_around_b_24465209__"],},
    }
*/

//android-platform\bionic\libc\include\link.h
#if defined(__LP64__)
#define ElfW(type) Elf64_ ## type
#else
#define ElfW(type) Elf32_ ## type
#endif

//android-platform\bionic\linker\linker_common_types.h
// Android uses RELA for LP64.
#if defined(__LP64__)
#define USE_RELA 1
#endif

//android-platform\bionic\libc\kernel\uapi\asm-generic\int-ll64.h
//__signed__-->signed
typedef signed char __s8;
typedef unsigned char __u8;
typedef signed short __s16;
typedef unsigned short __u16;
typedef signed int __s32;
typedef unsigned int __u32;
typedef signed long long __s64;
typedef unsigned long long __u64;

//A12-src\msm-google\include\uapi\linux\elf.h
/* 32-bit ELF base types. */
typedef __u32   Elf32_Addr;
typedef __u16   Elf32_Half;
typedef __u32   Elf32_Off;
typedef __s32   Elf32_Sword;
typedef __u32   Elf32_Word;

/* 64-bit ELF base types. */
typedef __u64   Elf64_Addr;
typedef __u16   Elf64_Half;
typedef __s16   Elf64_SHalf;
typedef __u64   Elf64_Off;
typedef __s32   Elf64_Sword;
typedef __u32   Elf64_Word;
typedef __u64   Elf64_Xword;
typedef __s64   Elf64_Sxword;

typedef struct dynamic{
  Elf32_Sword d_tag;
  union{
    Elf32_Sword d_val;
    Elf32_Addr  d_ptr;
  } d_un;
} Elf32_Dyn;

typedef struct {
  Elf64_Sxword d_tag;       /* entry tag value */
  union {
    Elf64_Xword d_val;
    Elf64_Addr d_ptr;
  } d_un;
} Elf64_Dyn;

typedef struct elf32_rel {
  Elf32_Addr    r_offset;
  Elf32_Word    r_info;
} Elf32_Rel;

typedef struct elf64_rel {
  Elf64_Addr r_offset;  /* Location at which to apply the action */
  Elf64_Xword r_info;   /* index and type of relocation */
} Elf64_Rel;

typedef struct elf32_rela{
  Elf32_Addr    r_offset;
  Elf32_Word    r_info;
  Elf32_Sword   r_addend;
} Elf32_Rela;

typedef struct elf64_rela {
  Elf64_Addr r_offset;  /* Location at which to apply the action */
  Elf64_Xword r_info;   /* index and type of relocation */
  Elf64_Sxword r_addend;    /* Constant addend used to compute value */
} Elf64_Rela;

typedef struct elf32_sym{
  Elf32_Word    st_name;
  Elf32_Addr    st_value;
  Elf32_Word    st_size;
  unsigned char st_info;
  unsigned char st_other;
  Elf32_Half    st_shndx;
} Elf32_Sym;

typedef struct elf64_sym {
  Elf64_Word st_name;       /* Symbol name, index in string tbl */
  unsigned char st_info;    /* Type and binding attributes */
  unsigned char st_other;   /* No defined meaning, 0 */
  Elf64_Half st_shndx;      /* Associated section index */
  Elf64_Addr st_value;      /* Value of the symbol */
  Elf64_Xword st_size;      /* Associated symbol size */
} Elf64_Sym;

#define EI_NIDENT   16

typedef struct elf32_hdr{
  unsigned char e_ident[EI_NIDENT];
  Elf32_Half    e_type;
  Elf32_Half    e_machine;
  Elf32_Word    e_version;
  Elf32_Addr    e_entry;  /* Entry point */
  Elf32_Off e_phoff;
  Elf32_Off e_shoff;
  Elf32_Word    e_flags;
  Elf32_Half    e_ehsize;
  Elf32_Half    e_phentsize;
  Elf32_Half    e_phnum;
  Elf32_Half    e_shentsize;
  Elf32_Half    e_shnum;
  Elf32_Half    e_shstrndx;
} Elf32_Ehdr;

typedef struct elf64_hdr {
  unsigned char e_ident[EI_NIDENT]; /* ELF "magic number" */
  Elf64_Half e_type;
  Elf64_Half e_machine;
  Elf64_Word e_version;
  Elf64_Addr e_entry;       /* Entry point virtual address */
  Elf64_Off e_phoff;        /* Program header table file offset */
  Elf64_Off e_shoff;        /* Section header table file offset */
  Elf64_Word e_flags;
  Elf64_Half e_ehsize;
  Elf64_Half e_phentsize;
  Elf64_Half e_phnum;
  Elf64_Half e_shentsize;
  Elf64_Half e_shnum;
  Elf64_Half e_shstrndx;
} Elf64_Ehdr;

/* These constants define the permissions on sections in the program
   header, p_flags. */
#define PF_R        0x4
#define PF_W        0x2
#define PF_X        0x1

typedef struct elf32_phdr{
  Elf32_Word    p_type;
  Elf32_Off p_offset;
  Elf32_Addr    p_vaddr;
  Elf32_Addr    p_paddr;
  Elf32_Word    p_filesz;
  Elf32_Word    p_memsz;
  Elf32_Word    p_flags;
  Elf32_Word    p_align;
} Elf32_Phdr;

typedef struct elf64_phdr {
  Elf64_Word p_type;
  Elf64_Word p_flags;
  Elf64_Off p_offset;       /* Segment file offset */
  Elf64_Addr p_vaddr;       /* Segment virtual address */
  Elf64_Addr p_paddr;       /* Segment physical address */
  Elf64_Xword p_filesz;     /* Segment size in file */
  Elf64_Xword p_memsz;      /* Segment size in memory */
  Elf64_Xword p_align;      /* Segment alignment, file & memory */
} Elf64_Phdr;

typedef struct elf32_shdr {
  Elf32_Word    sh_name;
  Elf32_Word    sh_type;
  Elf32_Word    sh_flags;
  Elf32_Addr    sh_addr;
  Elf32_Off sh_offset;
  Elf32_Word    sh_size;
  Elf32_Word    sh_link;
  Elf32_Word    sh_info;
  Elf32_Word    sh_addralign;
  Elf32_Word    sh_entsize;
} Elf32_Shdr;

typedef struct elf64_shdr {
  Elf64_Word sh_name;       /* Section name, index in string tbl */
  Elf64_Word sh_type;       /* Type of section */
  Elf64_Xword sh_flags;     /* Miscellaneous section attributes */
  Elf64_Addr sh_addr;       /* Section virtual addr at execution */
  Elf64_Off sh_offset;      /* Section file offset */
  Elf64_Xword sh_size;      /* Size of section in bytes */
  Elf64_Word sh_link;       /* Index of another section */
  Elf64_Word sh_info;       /* Additional section information */
  Elf64_Xword sh_addralign; /* Section alignment */
  Elf64_Xword sh_entsize;   /* Entry size if section holds table */
} Elf64_Shdr;

//android-platform\bionic\linker\linker_soinfo.h
typedef void (*linker_dtor_function_t)();
typedef void (*linker_ctor_function_t)(int, char**, char**);

#if defined(__work_around_b_24465209__)
#define SOINFO_NAME_LEN 128
#endif

struct soinfo {
#if defined(__work_around_b_24465209__)
  char old_name_[SOINFO_NAME_LEN];
#endif
  const ElfW(Phdr)* phdr;
  size_t phnum;
#if defined(__work_around_b_24465209__)
  ElfW(Addr) unused0; // DO NOT USE, maintained for compatibility.
#endif
  ElfW(Addr) base;
  size_t size;

#if defined(__work_around_b_24465209__)
  uint32_t unused1;  // DO NOT USE, maintained for compatibility.
#endif

  ElfW(Dyn)* dynamic;

#if defined(__work_around_b_24465209__)
  uint32_t unused2; // DO NOT USE, maintained for compatibility
  uint32_t unused3; // DO NOT USE, maintained for compatibility
#endif

  soinfo* next;
  uint32_t flags_;

  const char* strtab_;
  ElfW(Sym)* symtab_;

  size_t nbucket_;
  size_t nchain_;
  uint32_t* bucket_;
  uint32_t* chain_;

#if !defined(__LP64__)
  ElfW(Addr)** unused4; // DO NOT USE, maintained for compatibility
#endif

#if defined(USE_RELA)
  ElfW(Rela)* plt_rela_;
  size_t plt_rela_count_;

  ElfW(Rela)* rela_;
  size_t rela_count_;
#else
  ElfW(Rel)* plt_rel_;
  size_t plt_rel_count_;

  ElfW(Rel)* rel_;
  size_t rel_count_;
#endif

  linker_ctor_function_t* preinit_array_;
  size_t preinit_array_count_;

  linker_ctor_function_t* init_array_;
  size_t init_array_count_;
  linker_dtor_function_t* fini_array_;
  size_t fini_array_count_;

  linker_ctor_function_t init_func_;
  linker_dtor_function_t fini_func_;

/*
#if defined (__arm__)
  // ARM EABI section used for stack unwinding.
  uint32_t* ARM_exidx;
  size_t ARM_exidx_count;
#endif
  size_t ref_count_;
// 怎么找不 link_map 这个类型的声明...
  link_map link_map_head;

  bool constructors_called;

  // When you read a virtual address from the ELF file, add this
  //value to get the corresponding address in the process' address space.
  ElfW (Addr) load_bias;

#if !defined (__LP64__)
  bool has_text_relocations;
#endif
  bool has_DT_SYMBOLIC;
*/
};
查看伪代码发现还有对结构体有一些魔改的痕迹
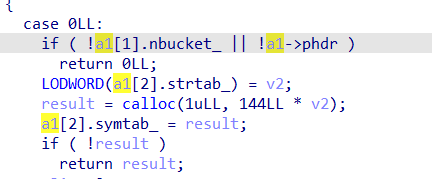
对函数进行交叉引用,继续分析
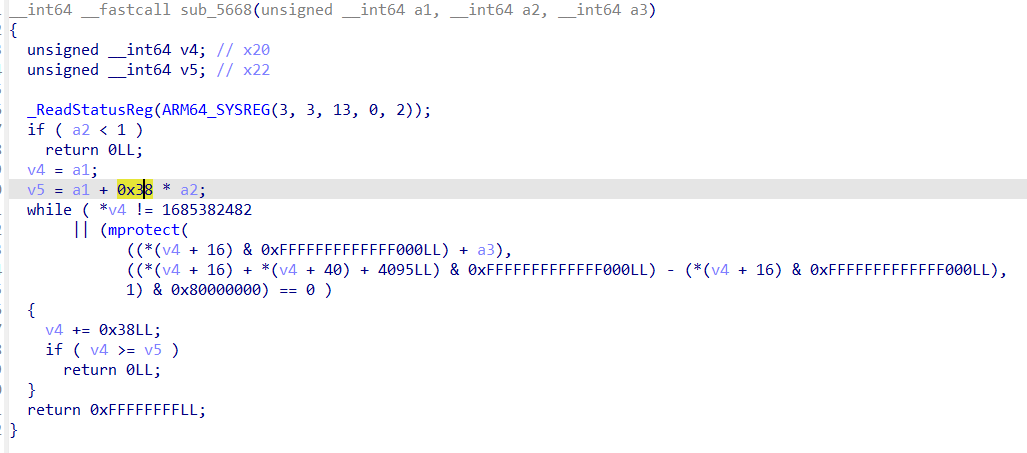
这个函数中出现了 0x38 这个数字, 0x38 是这个循环的步长
刚刚提取出来的 elf 用 010editor 打开,看到 elf_header 的 phentsize 这个字段,这个字段的含义是一个 Program header table 的长度,它正正好好也是 0x38
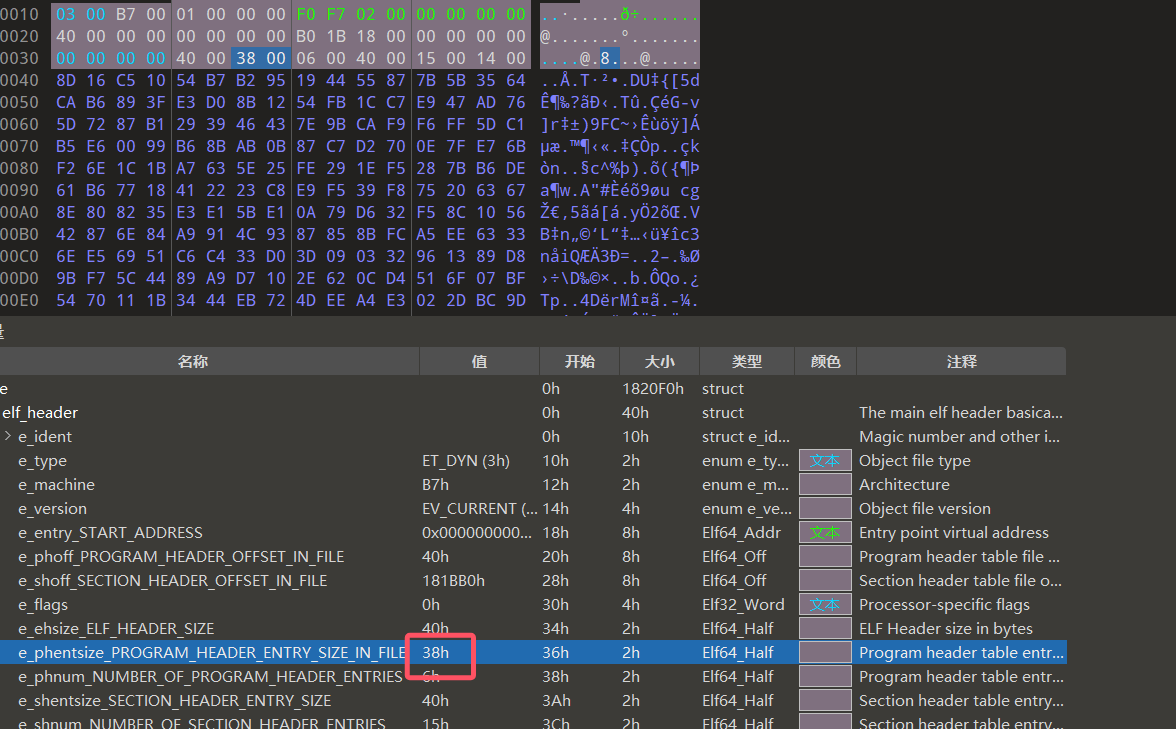
所以说在 sub_5668 中变量 v5 的类型应该是 Elf64_Phdr * , 我们直接重定义类型
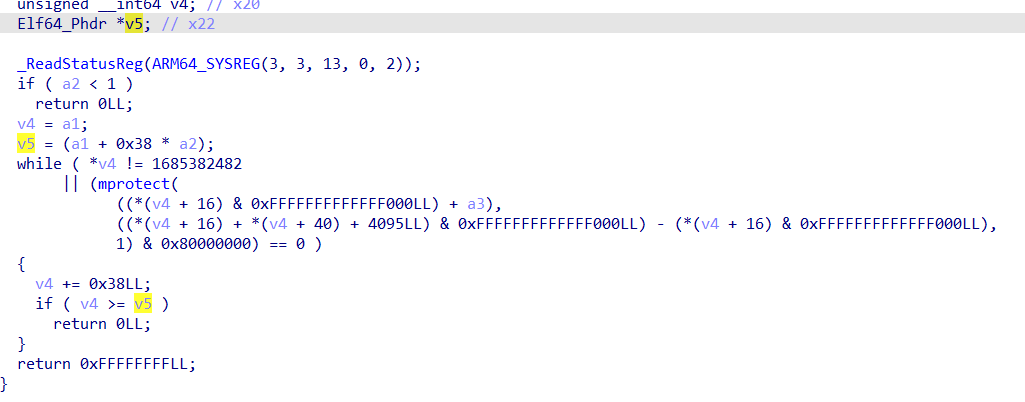
既然我们知道了真正的program header table就是在这个位置的,那我们之后需要的话就可以在这个地方把program header table整个给 dump 下来就行
对照流程图和交叉引用可以判断出是sub_440C-->sub_4340-->sub_5668
然后对应调用链往上查看对应的函数
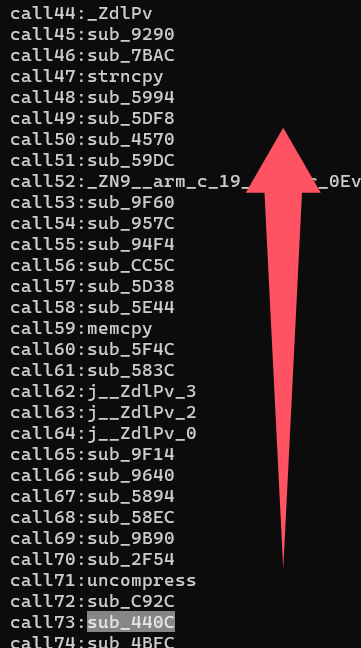
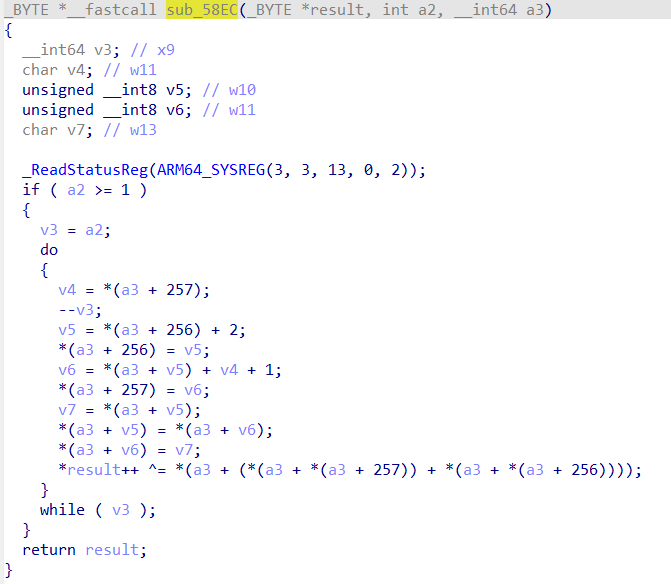
然后我们在sub_58EC中看到了熟悉的RC4
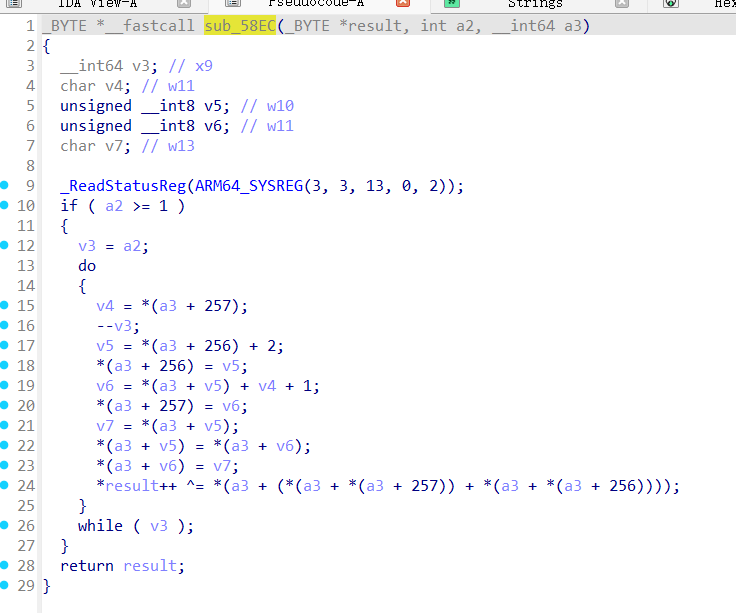
但是翻了半天函数没有看到RC4的初始化函数,在汇编界面往上翻到未声明的代码loc_571C,声明后可看到完整的函数
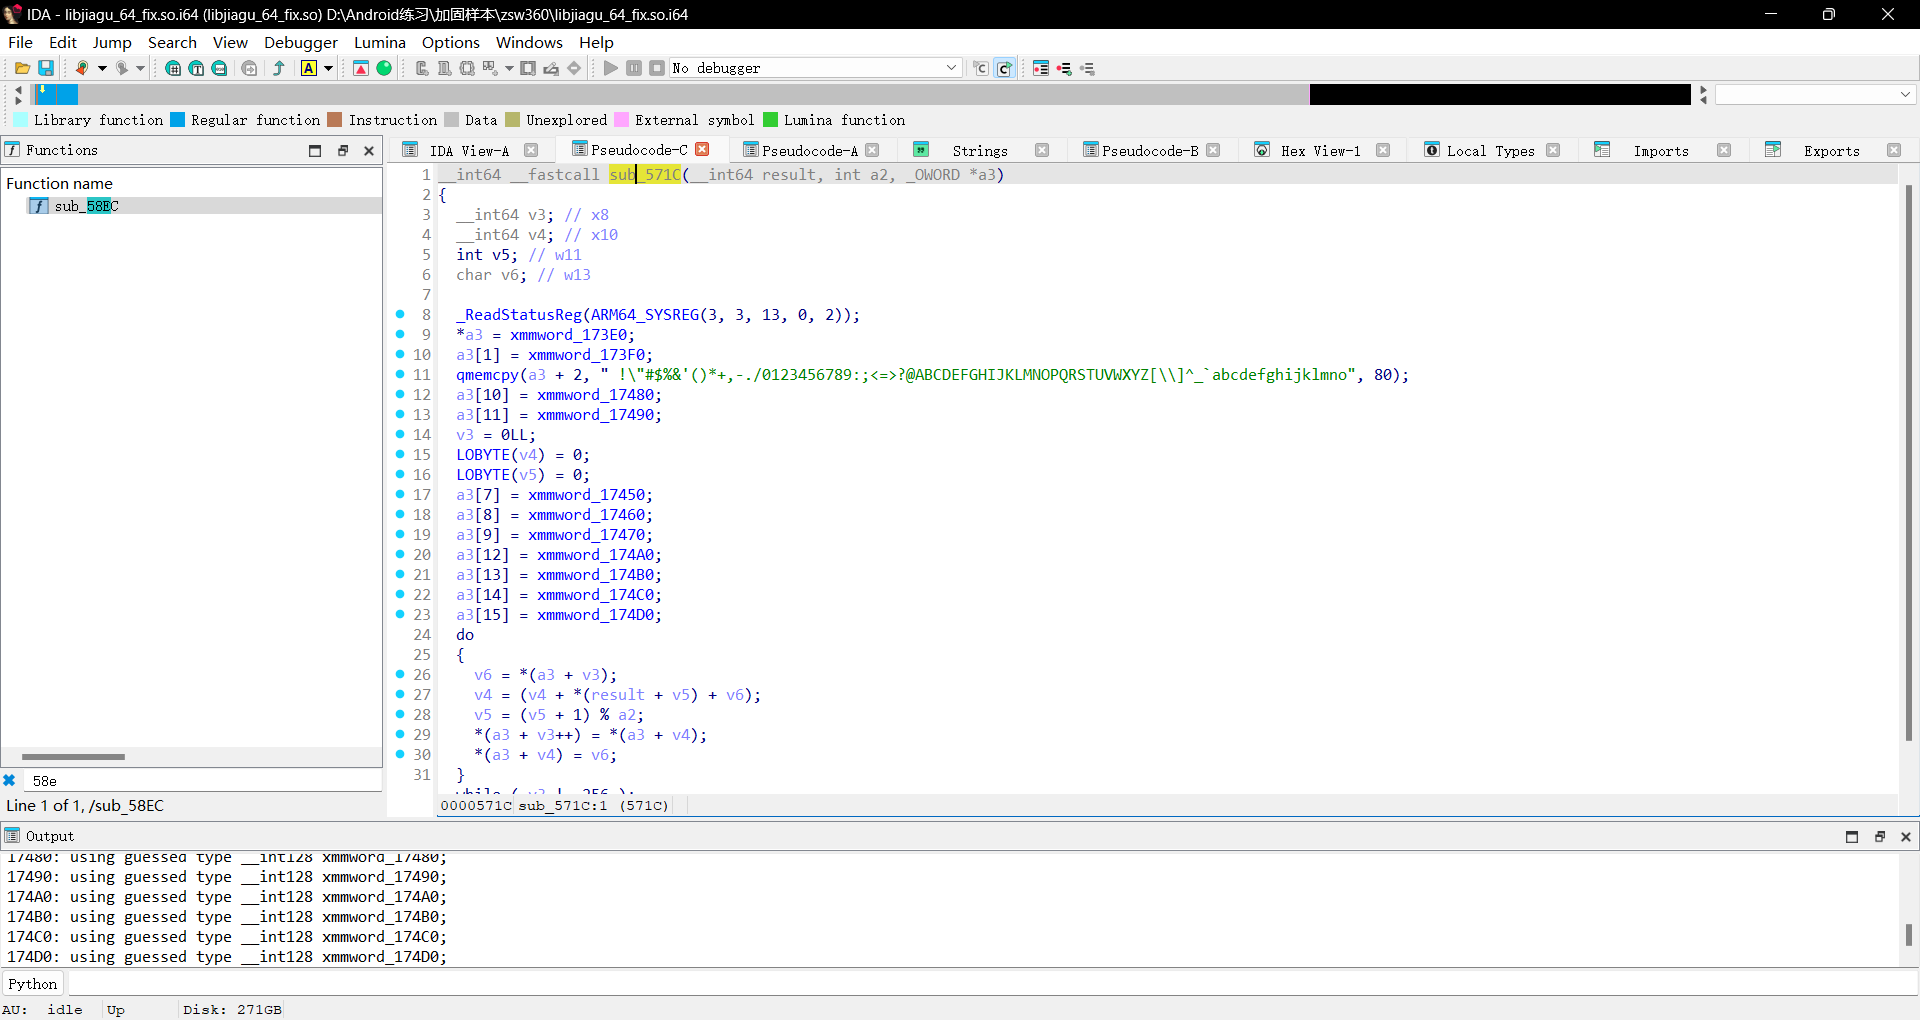
我们尝试一下hook这个函数的返回值
function hook_rc4(){
    var module = Process.findModuleByName("libjiagu_64.so");
    Interceptor.attach(module.base.add(0x5834), {
        // fd, buff, len
        onEnter: function (args) {
            console.log(hexdump(args[0], {
              offset: 0,// 相对偏移
              length: 0x10,//dump 的大小
              header: true,
              ansi: true
            }));
            console.log(args[1])
            console.log(args[2])
            console.log(`base = ${module.base}`)
        },
        onLeave: function (ret) {
        }
    });
}

function my_hook_dlopen(soName='') {
    Interceptor.attach(Module.findExportByName(null, "android_dlopen_ext"),
        {
            onEnter: function (args) {
                var pathptr = args[0];
                if (pathptr !== undefined && pathptr != null) {
                    var path = ptr(pathptr).readCString();
                    //console.log(path);
                    if (path.indexOf(soName) >= 0) {
                        this.is_can_hook = true;
                    }
                }
            },
            onLeave: function (retval) {
                if (this.is_can_hook) {
                    hook_rc4();
                }
            }
        }
    );
}
setImmediate(my_hook_dlopen,'libjiagu');
得到输出

接下来我们继续hookrc4加密部分的函数看一下加密的数据
function hook_rc4(){
    var module = Process.findModuleByName("libjiagu_64.so");
    Interceptor.attach(module.base.add(0x5834), {
        // fd, buff, len
        onEnter: function (args) {
            console.log(hexdump(args[0], {
              offset: 0,// 相对偏移
              length: 0x10,//dump 的大小
              header: true,
              ansi: true
            }));
            console.log(args[1])
            console.log(args[2])
            // console.log(`base = ${module.base}`)
        },
        onLeave: function (ret) {
        }
    });
}


function hook_rc4_enc(){
    var module = Process.findModuleByName("libjiagu_64.so");
    Interceptor.attach(module.base.add(0x58EC), {
        // fd, buff, len
        onEnter: function (args) {
            console.log(hexdump(args[0], {
              offset: 0,// 相对偏移
              length: 0x50,//dump 的大小
              header: true,
              ansi: true
            }));
            console.log(args[1])
            console.log(args[2])

        },
        onLeave: function (ret) {


        }
    });
}

function my_hook_dlopen(soName='') {
    Interceptor.attach(Module.findExportByName(null, "android_dlopen_ext"),
        {
            onEnter: function (args) {
                var pathptr = args[0];
                if (pathptr !== undefined && pathptr != null) {
                    var path = ptr(pathptr).readCString();
                    //console.log(path);
                    if (path.indexOf(soName) >= 0) {
                        this.is_can_hook = true;
                    }
                }
            },
            onLeave: function (retval) {
                if (this.is_can_hook) {
                    hook_rc4();
                    hook_rc4_enc();
                }
            }
        }
    );
}
setImmediate(my_hook_dlopen,'libjiagu');

这个0xb9956似乎在前面加载so文件的函数中中有出现过
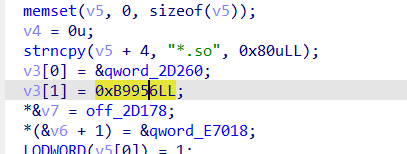
我们在查看 qword_2D260 中的数据可以看到与我们hook的数据相同
也是由 EB 57 7F BF A5 A0 33 14 04 开头的

已知密文是qword_2D260 密钥是 vUV4#\x91#SVt
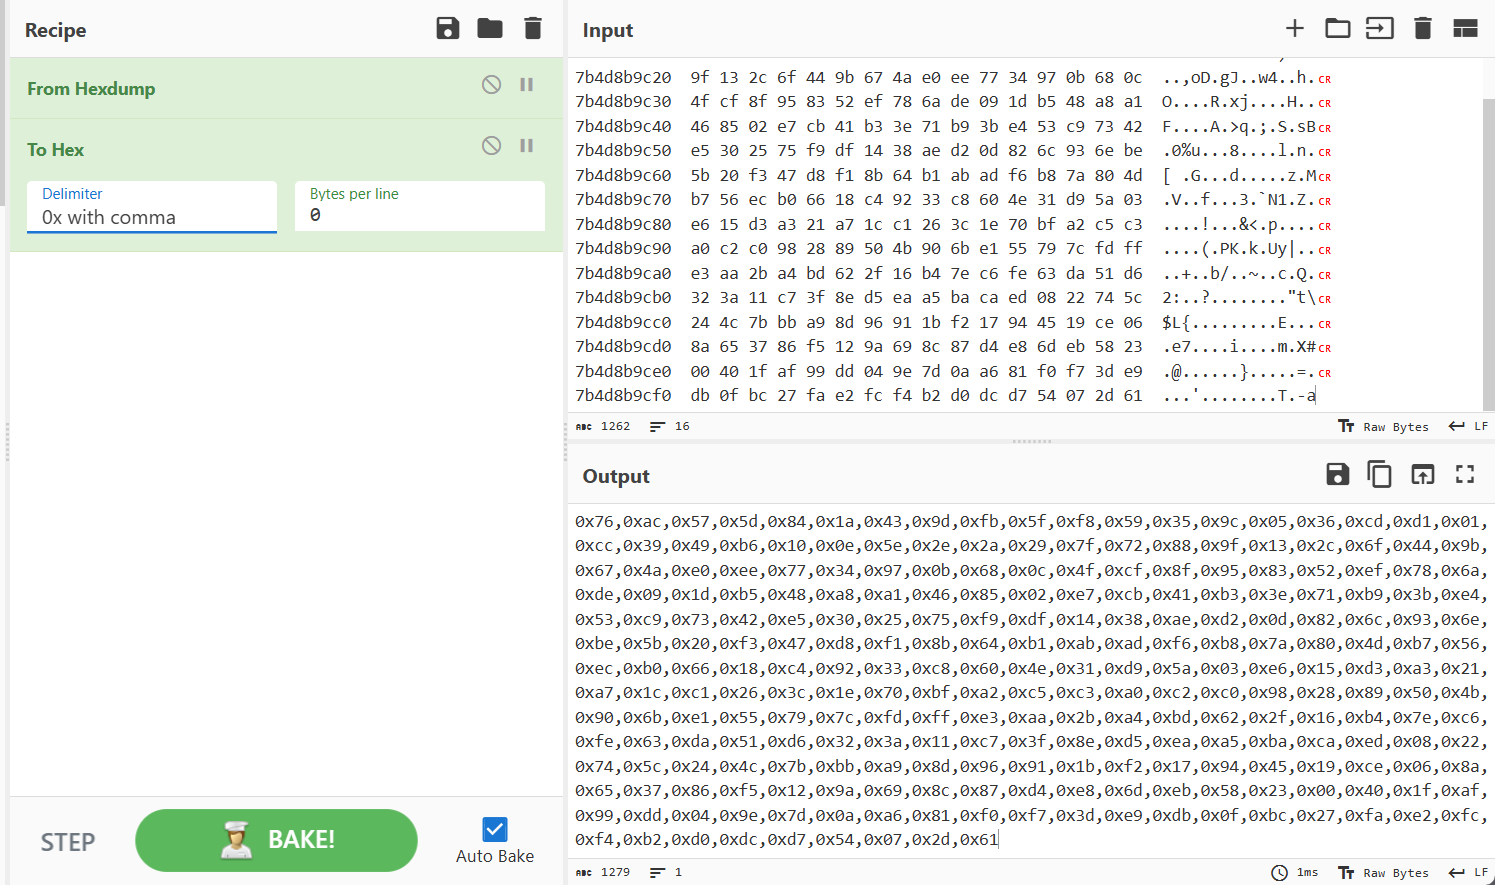
那我们直接hook他的sbox进行解密
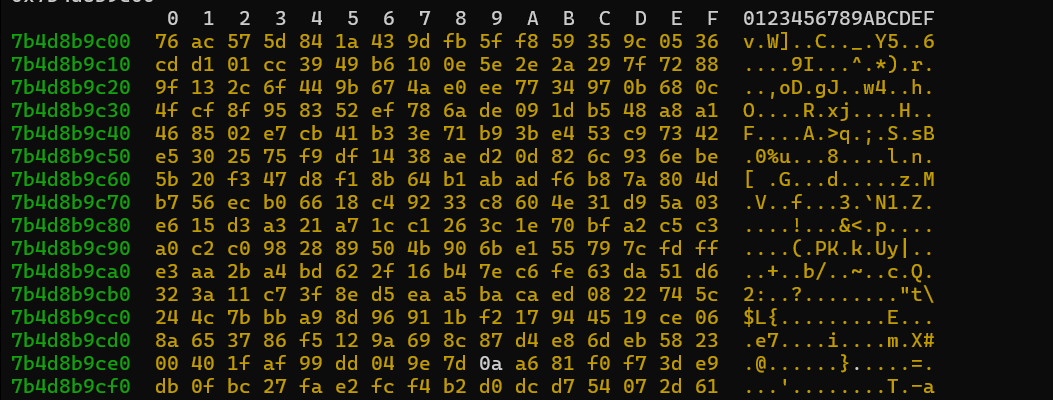
使用hexdump转换一下
又发现对rc4的Sbox进行了魔改
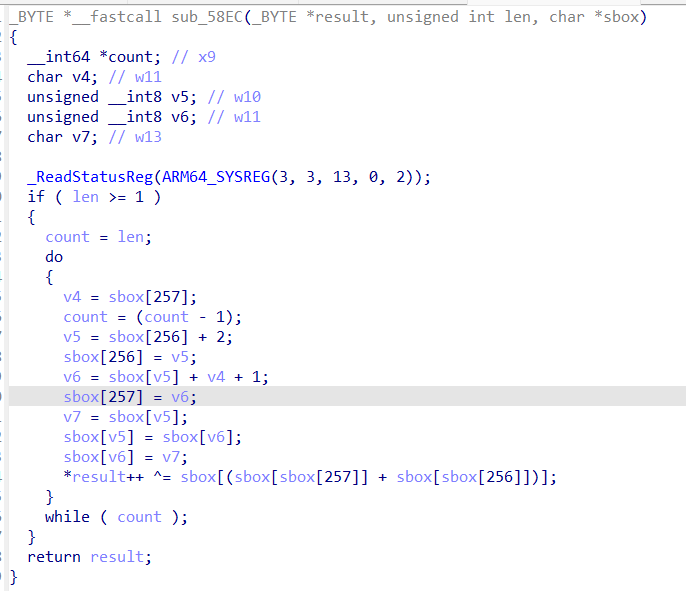
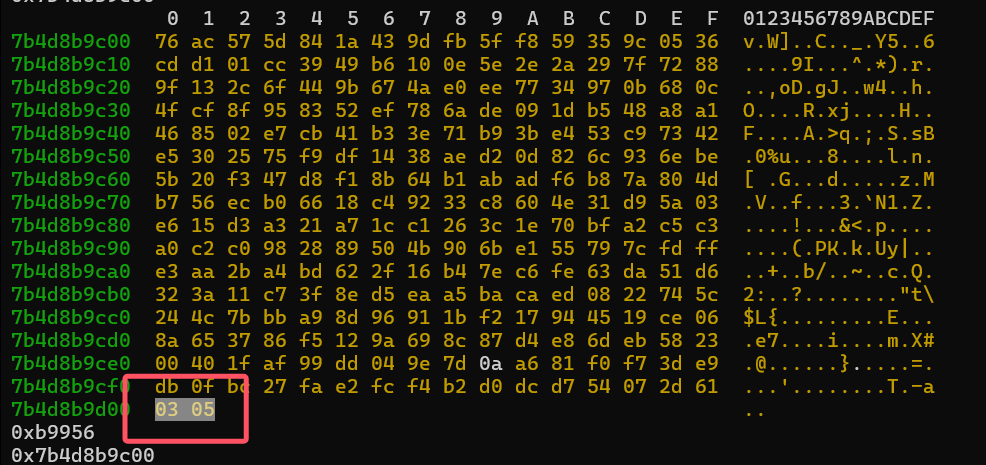
因为魔改的原因,就会导致最后的i , j 来自于Sbox的第257和258位
我们尝试多hook两位数据看看,发现是3和5
使用脚本读取密文并用hook到的sbox以及最后一次循环的i,j再进行解密
import zlib
import struct


def RC4(data, key):
    for i in range(0, 8):
        print(hex(data[i]))
    S = list(range(256))
    j = 0
    out = []

    S = [0x76, 0xac, 0x57, 0x5d, 0x84, 0x1a, 0x43, 0x9d, 0xfb, 0x5f, 0xf8, 0x59, 0x35, 0x9c, 0x05, 0x36, 0xcd, 0xd1,0x01, 0xcc, 0x39, 0x49, 0xb6, 0x10, 0x0e, 0x5e, 0x2e, 0x2a, 0x29, 0x7f, 0x72, 0x88, 0x9f, 0x13, 0x2c, 0x6f,
0x44, 0x9b, 0x67, 0x4a, 0xe0, 0xee, 0x77, 0x34, 0x97, 0x0b, 0x68, 0x0c, 0x4f, 0xcf, 0x8f, 0x95, 0x83, 0x52,
0xef, 0x78, 0x6a, 0xde, 0x09, 0x1d, 0xb5, 0x48, 0xa8, 0xa1, 0x46, 0x85, 0x02, 0xe7, 0xcb, 0x41, 0xb3, 0x3e,
0x71, 0xb9, 0x3b, 0xe4, 0x53, 0xc9, 0x73, 0x42, 0xe5, 0x30, 0x25, 0x75, 0xf9, 0xdf, 0x14, 0x38, 0xae, 0xd2,
0x0d, 0x82, 0x6c, 0x93, 0x6e, 0xbe, 0x5b, 0x20, 0xf3, 0x47, 0xd8, 0xf1, 0x8b, 0x64, 0xb1, 0xab, 0xad, 0xf6,
0xb8, 0x7a, 0x80, 0x4d, 0xb7, 0x56, 0xec, 0xb0, 0x66, 0x18, 0xc4, 0x92, 0x33, 0xc8, 0x60, 0x4e, 0x31, 0xd9,
0x5a, 0x03, 0xe6, 0x15, 0xd3, 0xa3, 0x21, 0xa7, 0x1c, 0xc1, 0x26, 0x3c, 0x1e, 0x70, 0xbf, 0xa2, 0xc5, 0xc3,
0xa0, 0xc2, 0xc0, 0x98, 0x28, 0x89, 0x50, 0x4b, 0x90, 0x6b, 0xe1, 0x55, 0x79, 0x7c, 0xfd, 0xff, 0xe3, 0xaa,
0x2b, 0xa4, 0xbd, 0x62, 0x2f, 0x16, 0xb4, 0x7e, 0xc6, 0xfe, 0x63, 0xda, 0x51, 0xd6, 0x32, 0x3a, 0x11, 0xc7,
0x3f, 0x8e, 0xd5, 0xea, 0xa5, 0xba, 0xca, 0xed, 0x08, 0x22, 0x74, 0x5c, 0x24, 0x4c, 0x7b, 0xbb, 0xa9, 0x8d,
0x96, 0x91, 0x1b, 0xf2, 0x17, 0x94, 0x45, 0x19, 0xce, 0x06, 0x8a, 0x65, 0x37, 0x86, 0xf5, 0x12, 0x9a, 0x69,
0x8c, 0x87, 0xd4, 0xe8, 0x6d, 0xeb, 0x58, 0x23, 0x00, 0x40, 0x1f, 0xaf, 0x99, 0xdd, 0x04, 0x9e, 0x7d, 0x0a,
0xa6, 0x81, 0xf0, 0xf7, 0x3d, 0xe9, 0xdb, 0x0f, 0xbc, 0x27, 0xfa, 0xe2, 0xfc, 0xf4, 0xb2, 0xd0, 0xdc, 0xd7,
0x54, 0x07, 0x2d, 0x61]
    i = 3
    j = 5
    for ch in data:
        i = (i + 2) % 256
        j = (j + S[i] + 1) % 256
        S[i], S[j] = S[j], S[i]
        out.append(ch ^ S[(S[i] + S[j]) % 256])

    return out


def RC4decrypt(ciphertext, key):
    return RC4(ciphertext, key)


wrap_elf_start = 0x2D260
wrap_elf_size = 0xB9956
key = b"vUV4#\x91#SVt"
with open('libjiagu_64_fix.so', 'rb') as f:
    wrap_elf = f.read()

# 对密文进行解密
dec_compress_elf = RC4decrypt(wrap_elf[wrap_elf_start:wrap_elf_start + wrap_elf_size], key)
dec_elf = zlib.decompress(bytes(dec_compress_elf[4::]))
with open('wrap_elf', 'wb') as f:
    f.write(dec_elf)
我们解密之后的文件似乎还有一点不对劲
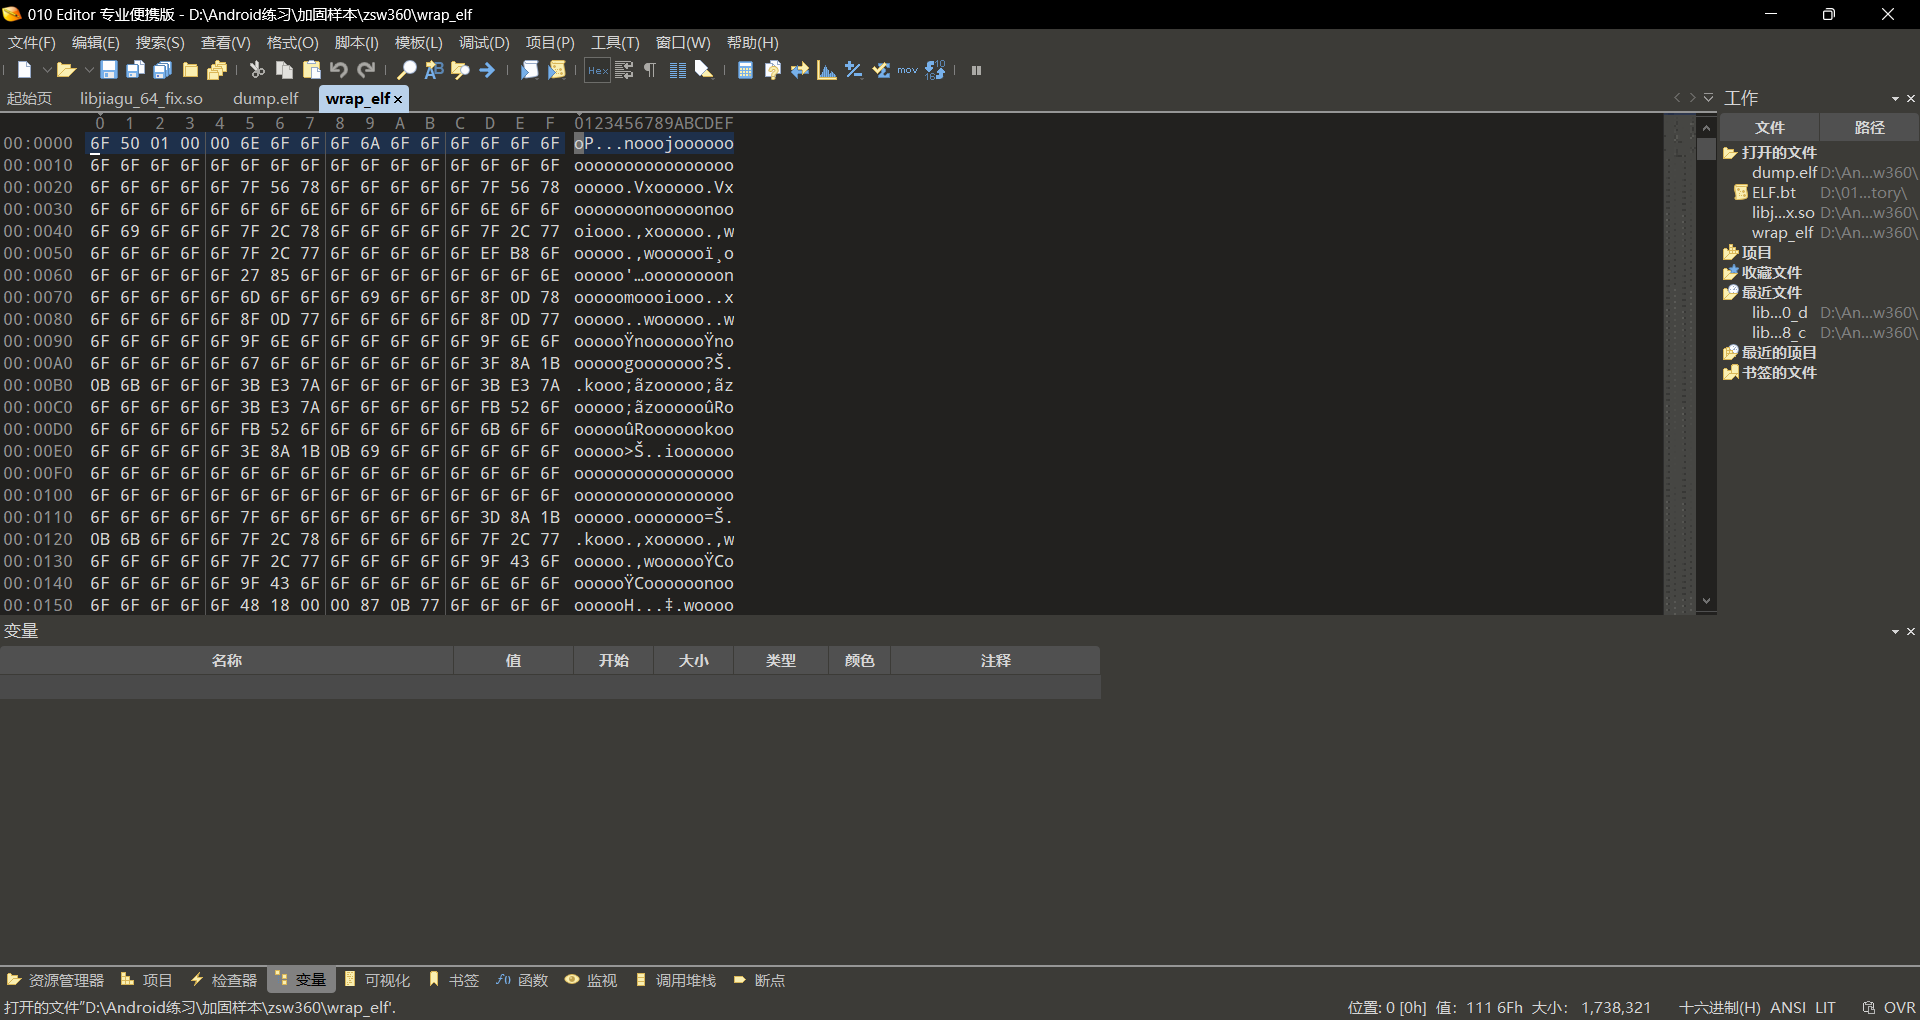
但是还是可以看到有elf文件的头存在
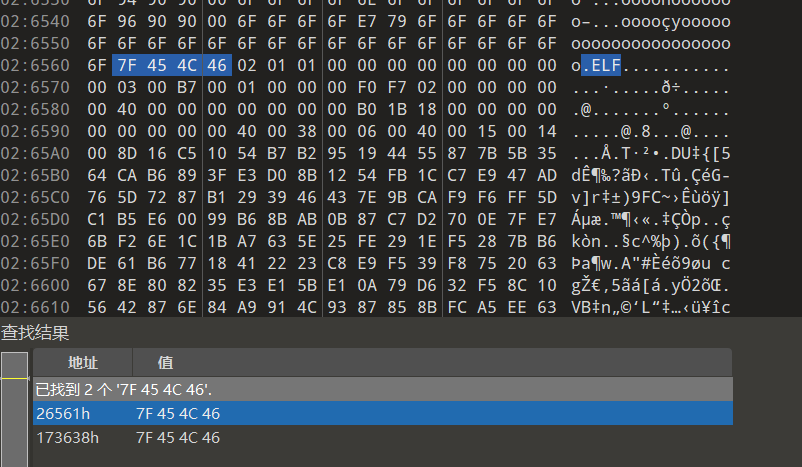
我们打开warp.elf可以看到其中还是包含着ELF头,我们可以写个脚本将其提取出来
with open('wrap_elf', 'rb') as f:
    wrap_elf = f.read()
ELF_magic = bytes([0x7F, 0x45, 0x4C, 0x46])
for i in range(len(wrap_elf) - len(ELF_magic) + 1):
    if wrap_elf[i:i + len(ELF_magic)] == ELF_magic:
        with open('libjiagu_0xe8000.so', 'wb') as f:
            f.write(wrap_elf[i::])
        break
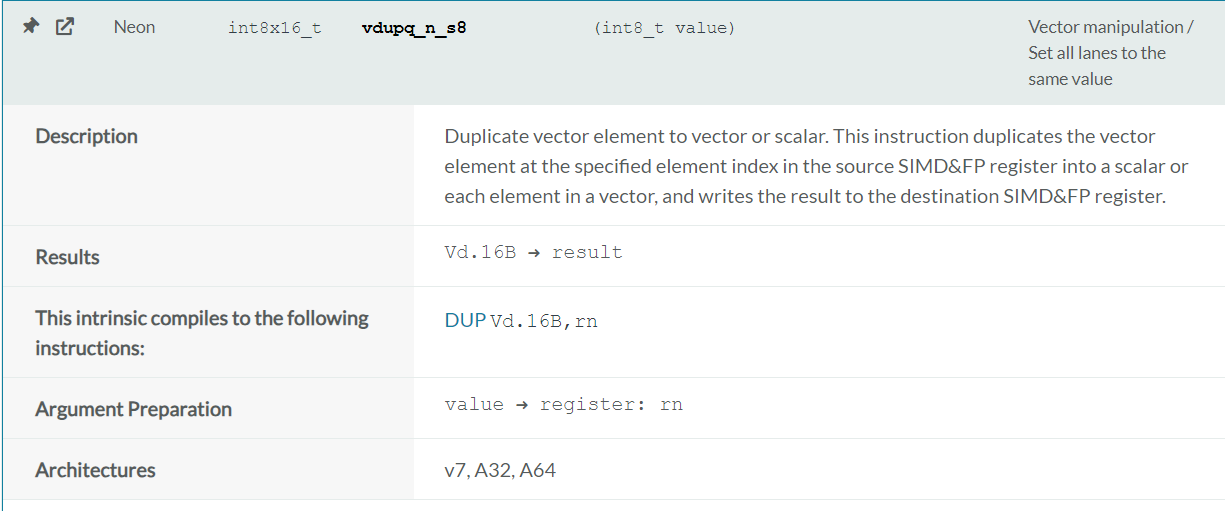
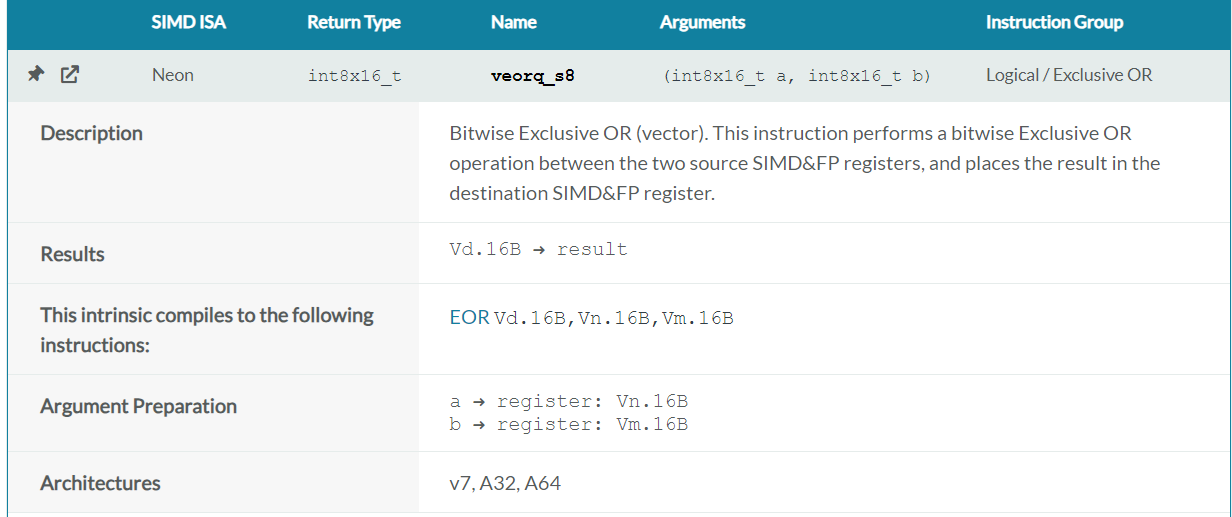
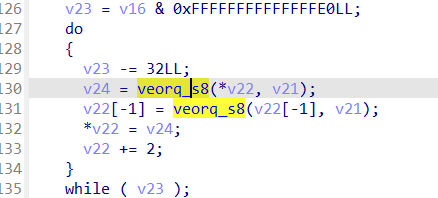
我们在sub_5304中找到了 veorq_s8这个函数,接下来用来解密的循环就是这个 arm64 的 neon 运算
官网可以找到 vdupq_n_s8 和 veorq_s8, 根据函数描述可以知道这里用向量运算,把向量中的每一个元素都异或了 0xd3
这里的意思就是第一个字节为异或的值,后面的四个字节表示异或的大小,此次即为后面0x150大小的区域都异或 0x6f

接下来按全流程解密这部分文件
import zlib
import struct
def RC4(data, key):
    for i in range(0,8):
        print(hex(data[i]))
    S = list(range(256))
    j = 0
    out = []

    S = [0x76,0xac,0x57,0x5d,0x84,0x1a,0x43,0x9d,0xfb,0x5f,0xf8,0x59,0x35,0x9c,0x05,0x36,0xcd,0xd1,0x01,0xcc,0x39,0x49,0xb6,0x10,0x0e,0x5e,0x2e,0x2a,0x29,0x7f,0x72,0x88,0x9f,0x13,0x2c,0x6f,0x44,0x9b,0x67,0x4a,0xe0,0xee,0x77,0x34,0x97,0x0b,0x68,0x0c,0x4f,0xcf,0x8f,0x95,0x83,0x52,0xef,0x78,0x6a,0xde,0x09,0x1d,0xb5,0x48,0xa8,0xa1,0x46,0x85,0x02,0xe7,0xcb,0x41,0xb3,0x3e,0x71,0xb9,0x3b,0xe4,0x53,0xc9,0x73,0x42,0xe5,0x30,0x25,0x75,0xf9,0xdf,0x14,0x38,0xae,0xd2,0x0d,0x82,0x6c,0x93,0x6e,0xbe,0x5b,0x20,0xf3,0x47,0xd8,0xf1,0x8b,0x64,0xb1,0xab,0xad,0xf6,0xb8,0x7a,0x80,0x4d,0xb7,0x56,0xec,0xb0,0x66,0x18,0xc4,0x92,0x33,0xc8,0x60,0x4e,0x31,0xd9,0x5a,0x03,0xe6,0x15,0xd3,0xa3,0x21,0xa7,0x1c,0xc1,0x26,0x3c,0x1e,0x70,0xbf,0xa2,0xc5,0xc3,0xa0,0xc2,0xc0,0x98,0x28,0x89,0x50,0x4b,0x90,0x6b,0xe1,0x55,0x79,0x7c,0xfd,0xff,0xe3,0xaa,0x2b,0xa4,0xbd,0x62,0x2f,0x16,0xb4,0x7e,0xc6,0xfe,0x63,0xda,0x51,0xd6,0x32,0x3a,0x11,0xc7,0x3f,0x8e,0xd5,0xea,0xa5,0xba,0xca,0xed,0x08,0x22,0x74,0x5c,0x24,0x4c,0x7b,0xbb,0xa9,0x8d,0x96,0x91,0x1b,0xf2,0x17,0x94,0x45,0x19,0xce,0x06,0x8a,0x65,0x37,0x86,0xf5,0x12,0x9a,0x69,0x8c,0x87,0xd4,0xe8,0x6d,0xeb,0x58,0x23,0x00,0x40,0x1f,0xaf,0x99,0xdd,0x04,0x9e,0x7d,0x0a,0xa6,0x81,0xf0,0xf7,0x3d,0xe9,0xdb,0x0f,0xbc,0x27,0xfa,0xe2,0xfc,0xf4,0xb2,0xd0,0xdc,0xd7,0x54,0x07,0x2d,0x61]
    i = 0x3
    j = 0x5
    for ch in data:
        i = (i + 2) % 256
        j = (j + S[i] + 1) % 256
        S[i], S[j] = S[j], S[i]
        out.append(ch ^ S[(S[i] + S[j]) % 256])

    return out

def RC4decrypt(ciphertext, key):
    return RC4(ciphertext, key)


wrap_elf_start = 0x2D260
wrap_elf_size = 0xB9956
key = b"vUV4#\x91#SVt"
with open('libjiagu_64.so_Fix','rb') as f:
    wrap_elf = f.read()


# 对密文进行解密
dec_compress_elf = RC4decrypt(wrap_elf[wrap_elf_start:wrap_elf_start+wrap_elf_size], key)
dec_elf = zlib.decompress(bytes(dec_compress_elf[4::]))
with open('wrap_elf','wb') as f:
    f.write(dec_elf)


class part:
    def __init__(self):
        self.name = ""
        self.value = b''
        self.offset = 0
        self.size = 0


index = 1
extra_part = [part() for _ in range(7)]
seg = ["a", "b", "c", "d"]
v_xor = dec_elf[0]
for i in range(4):
    size = int.from_bytes(dec_elf[index:index + 4], 'little')
    index += 4
    extra_part[i + 1].name = seg[i]
    extra_part[i + 1].value = bytes(map(lambda x: x ^ v_xor, dec_elf[index:index + size]))
    extra_part[i + 1].size = size
    index += size
for p in extra_part:
    if p.value != b'':
        filename = f"libjiagu.so_{hex(p.size)}_{p.name}"
        print(f"[{p.name}] get {filename}, size: {hex(p.size)}")
        with open(filename, 'wb') as f:
            f.write(p.value)

根据我们dump下来的数据的文件大小来判断需要替换的部分
- 修复program header table
我们的program header table的大小是0x38,有六个段,总共为0x150的Size

我们的 [a] 部分大小刚好对应上,直接选中将这部分数据替换
- 修复.dynamic
program_table_element[2]的(RW_) Dynamic Segment的p_offset_FROM_FILE_BEGIN指向.dynamic

我们跳转到这个地址替换 [d] 中的数据
- 修复重定位表
我们需要通过 .dynamic 段的 d_tag 字段来直到重定位表的位置,下面是 AOSP 中 d_tag 的宏定义
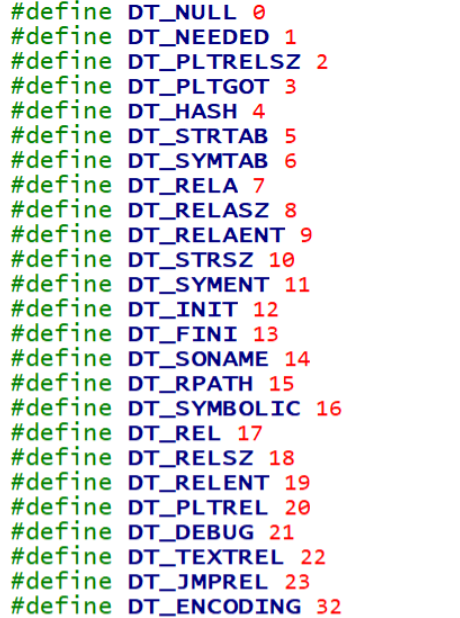
对于我们修复主 ELF 比较重要的 tag 有
| d_tag | 值 | 含义 |
|---|---|---|
| DT_JMPREL | 0x17 | .rela.plt 在文件中的偏移 |
| DT_PLTRELSZ | 0x2 | .rela.plt 的大小 |
| DT_RELA | 0x7 | .rela.dyn 在文件中的偏移 |
| DT_RELASZ | 0x8 | .rela.dyn 的大小 |
我们可以在 .dynamic 中发现这些 tag 以及对应的值

然后就跳转到 .rela.plt 和 .rela.dyn 的对应地址,然后把这些段本来的数据粘贴进去
全部导入后保存再用ida打开
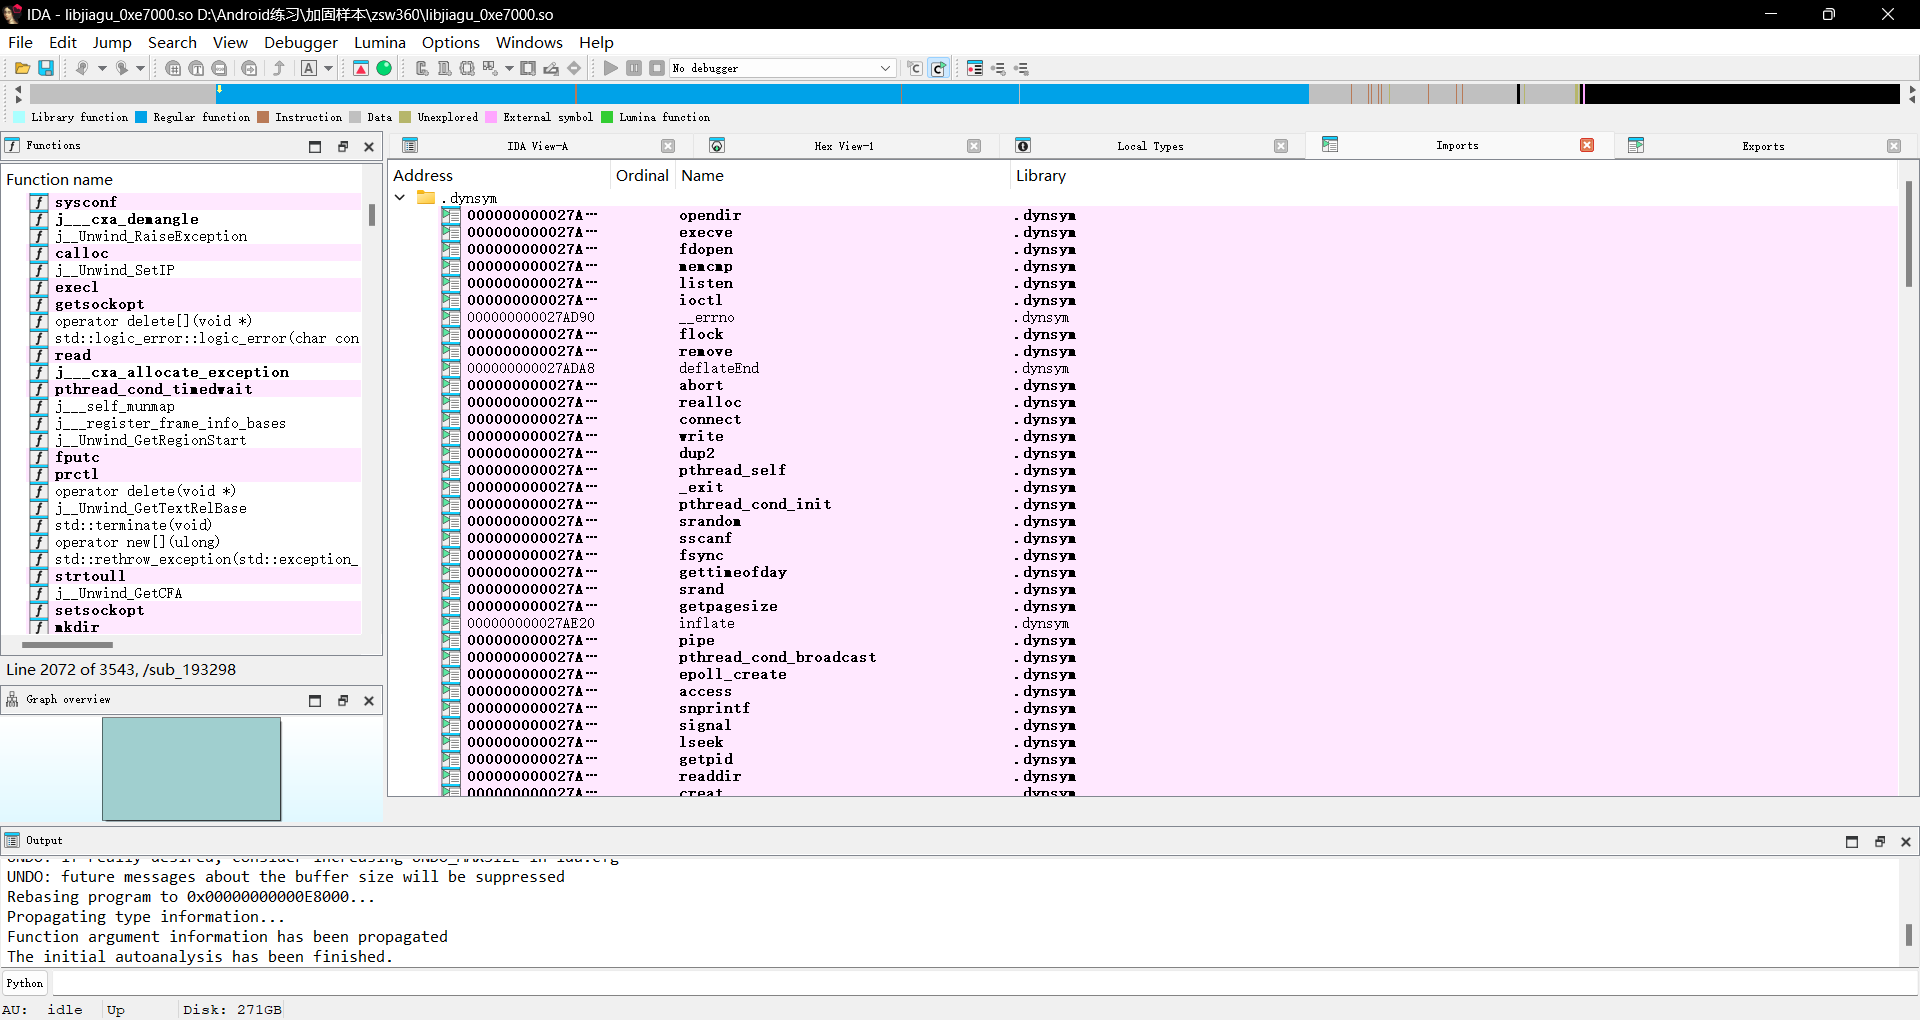
可以看到已经被修复的十分完美了
Dex释放流程
我们设置基址为0xe8000方便后续分析

我们之前hook流程的时候对dex打开的流程也有记录

可以看到在0x1196b0之后就调用了一些libart的函数,说明在这时候就已经完成解密了
从这个函数交叉引用可以看到上层调用的函数
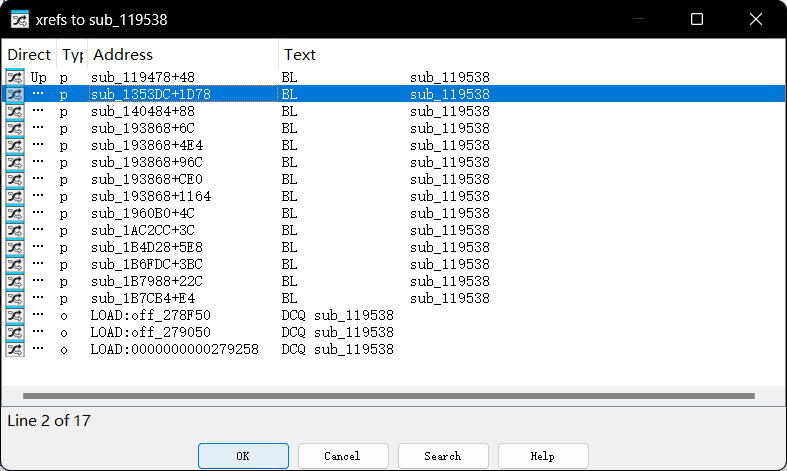
我们发现sub_193968对这个函数调用了很多次
我们跟踪进去查看,可以看到很多疑似解密的字符串
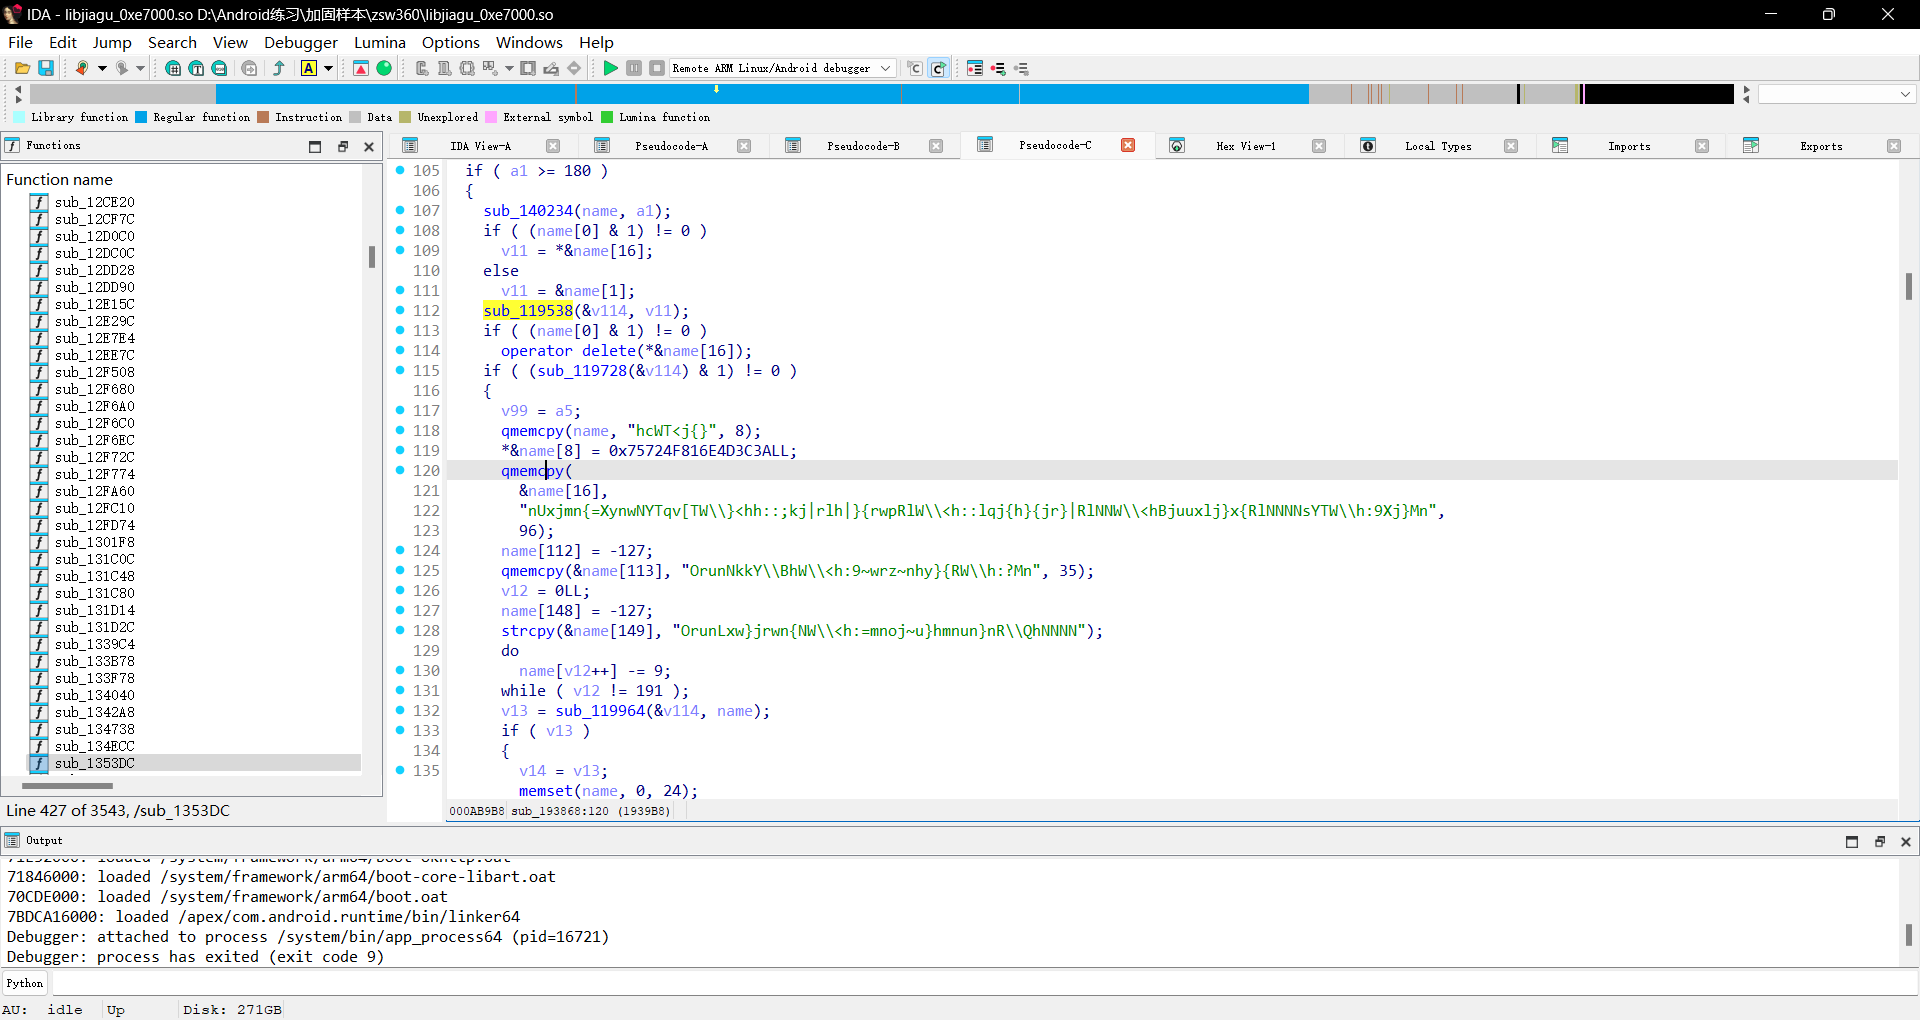
我们尝试hook一下这个函数的返回值看下对什么数据进行了操作
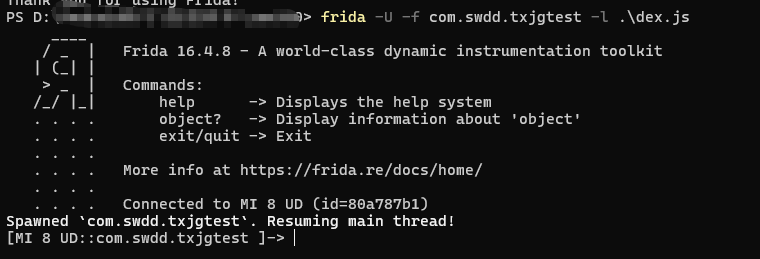
我们竟然hook不到任何数据,之后发现这不是壳ELF了,而是主ELF,所以我们对dlopen进行hook
function decdex() {
    var base = Process.findModuleByName("libjiagu_64.so").base.add(0x193868);
    var fileIndex = 0
    //console.log(base);
    Interceptor.attach(base, {
        onEnter: function (args) {
            console.log(hexdump(args[1], {
                offset: 0, length: 0x30, header: true, ansi: true
            }))
        }, onLeave: function (args) { }
    })
}

function my_hook_dlopen(soName='') {
    var once = true;
    Interceptor.attach(Module.findExportByName(null, "dlopen"),
        {
            onEnter: function (args) {
                var path = args[0].readCString();
                if (path.indexOf('libjiagu') != -1) {
                    if(path.indexOf(soName) >= 0 )
                        this.is_can_hook = true;
                }
            },
            onLeave: function (retval) {
                if (this.is_can_hook && once) {
                    decdex();
                    once = false;
                }
            }
        }
    );
}
setImmediate(my_hook_dlopen,'libjiagu');

现在我们可以看到解密之后的dex文件了
我们可以多输出两个参数看看
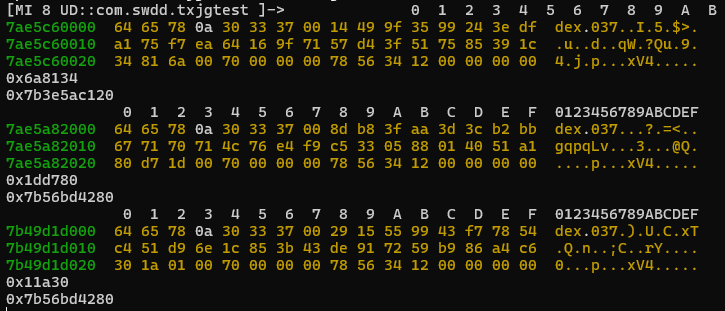
可以推测args[2]可能是文件Size
那么我们就可以读取size把dex文件dump下来
function decdex() {
    var base = Process.findModuleByName("libjiagu_64.so").base.add(0x193868);
    var fileIndex = 0
    //console.log(base);
    Interceptor.attach(base, {
        onEnter: function (args) {
            console.log("");
            console.log(hexdump(args[1], {
                offset: 0, length: 0x30, header: true, ansi: true
            }))
            console.log("Size:",args[2]);
            //console.log(args[3]);
            try {
                var length = args[2].toInt32();
                var data = Memory.readByteArray(args[1], length);

                var filePath = "/data/data/com.swdd.txjgtest/files/" + fileIndex + ".dex";
                var file_handle = new File(filePath, "wb");

                if (file_handle && file_handle != null) {
                    file_handle.write(data);
                    file_handle.flush();
                    file_handle.close();
                    console.log("Data written to " + filePath);
                    fileIndex++;
                } else {
                    console.log("Failed to create file: " + filePath);
                }
            } catch (e) {
                console.log("Error: " + e.message);
            }

        }, onLeave: function (args) { }
    })
}

function my_hook_dlopen(soName='') {
    var once = true;
    Interceptor.attach(Module.findExportByName(null, "dlopen"),
        {
            onEnter: function (args) {
                var path = args[0].readCString();
                if (path.indexOf('libjiagu') != -1) {
                    if(path.indexOf(soName) >= 0 )
                        this.is_can_hook = true;
                }
            },
            onLeave: function (retval) {
                if (this.is_can_hook && once) {
                    decdex();
                    once = false;
                }
            }
        }
    );
}
setImmediate(my_hook_dlopen,'libjiagu');
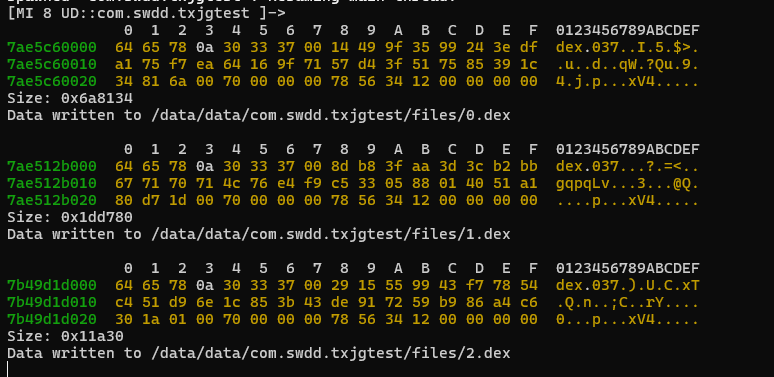
将dump下来的Dex文件查看可知已经成功脱壳
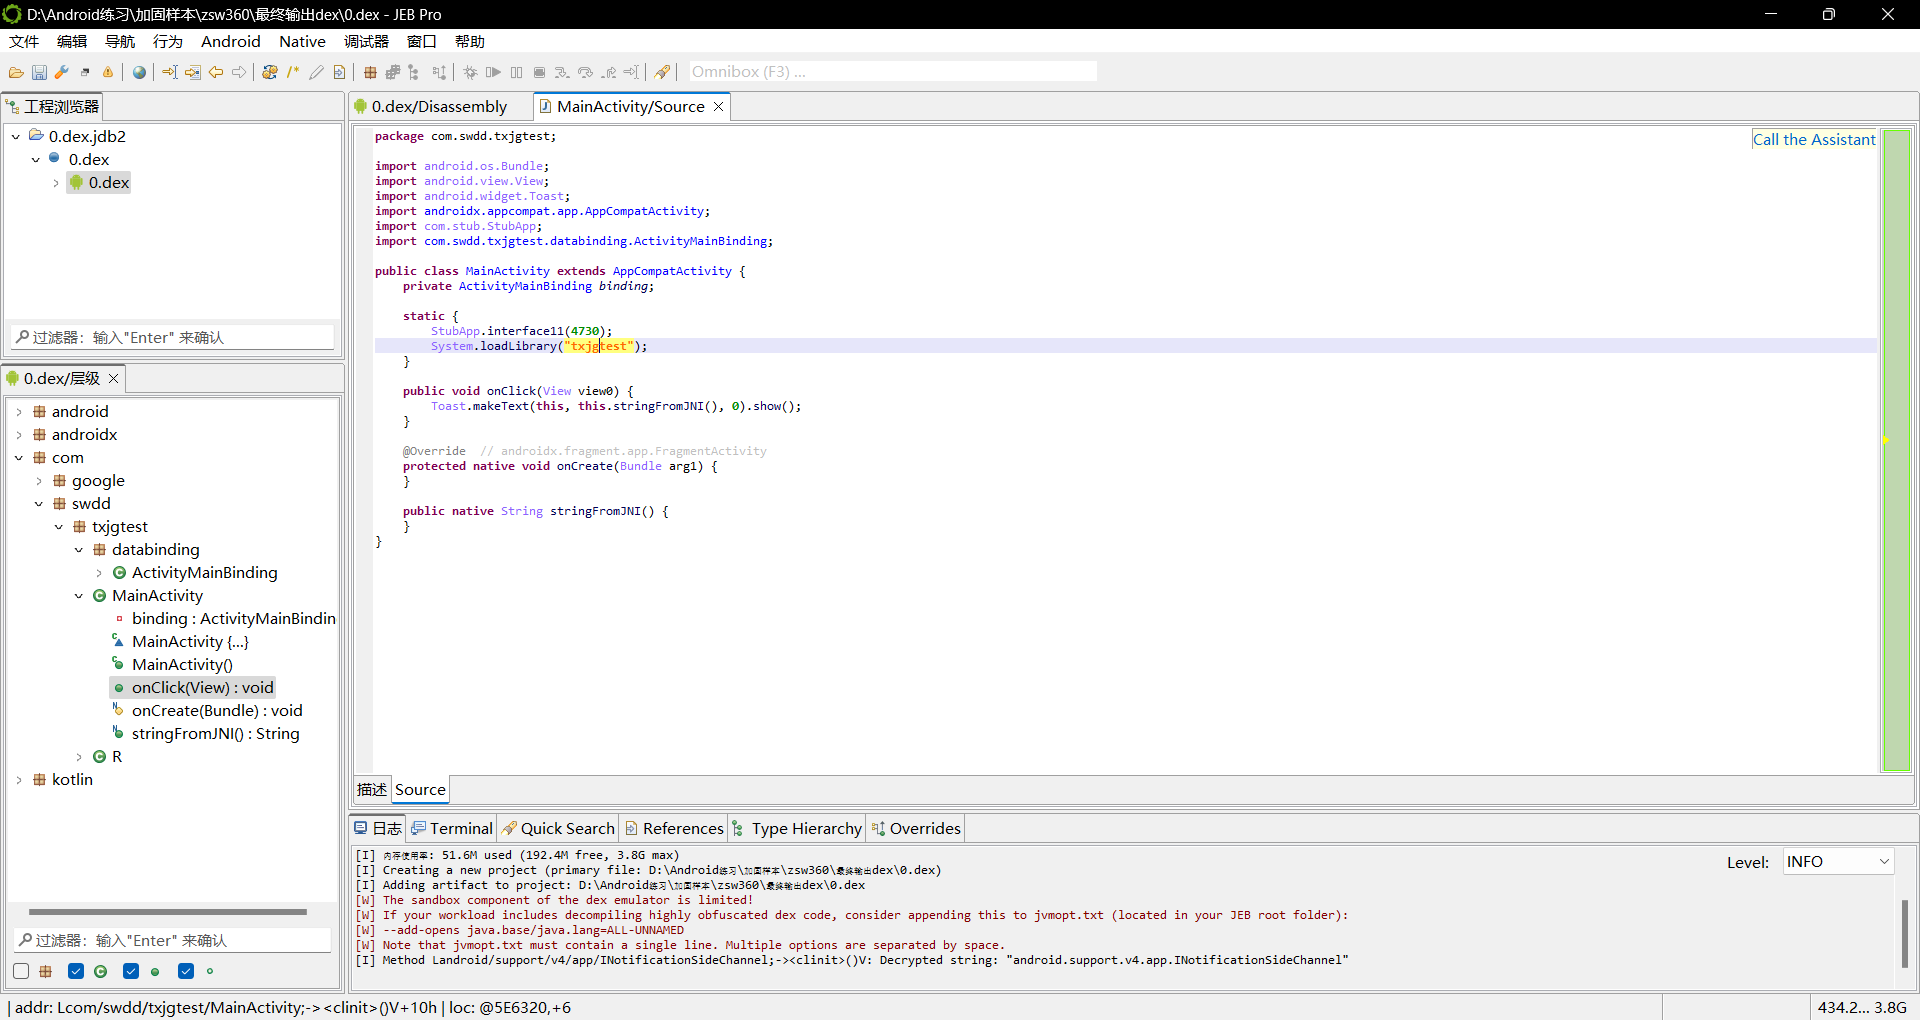
至此,360壳的分析到此结束